7 Internet-facing application deployment
Design and deploy an application with its internal Service and expose it externally using the Kubernetes Gateway API with path-based routing rules.
This category includes the following learning objectives:
- Understanding of Pods.
- Understanding of Deployments.
- Understanding of ClusterIP Services.
- Understanding of the Gateway API and how a Gateway sits in front of Services.
7.1 Setup
The Gateway API requires two things to work:
- The Custom Resource Definitions (CRDs) that define the resource types.
- A Gateway controller that watches those resources and programs the actual data plane.
The tasks in this category use NGINX Gateway Fabric as the Gateway controller.
7.1.1 Install the Gateway API CRDs
The Gateway API is not bundled with Kubernetes by default, but we can reference the documentation for installation instructions.
Install the standard Gateway API CRDs:
kubectl apply -f https://github.com/kubernetes-sigs/gateway-api/releases/download/v1.2.0/standard-install.yaml
Verify that the Gateway API CRDs were created:
kubectl get crds | grep gateway.networking.k8s.io
The output should include the following core Gateway API resource types:
gatewayclasses.gateway.networking.k8s.io    2026-03-05T10:00:00Z
gateways.gateway.networking.k8s.io          2026-03-05T10:00:00Z
httproutes.gateway.networking.k8s.io        2026-03-05T10:00:00Z
7.1.2 Install NGINX Gateway Fabric
Install the NGINX Gateway Fabric CRDs:
kubectl apply -f https://raw.githubusercontent.com/nginx/nginx-gateway-fabric/v1.6.2/deploy/crds.yaml
Verify that the NGINX Gateway Fabric CRDs were created:
kubectl get crds | grep gateway.nginx.org
The output should include the following NGINX Gateway Fabric resource types:
nginxgateways.gateway.nginx.org          2026-03-05T10:00:00Z
nginxproxies.gateway.nginx.org           2026-03-05T10:00:00Z
observabilitypolicies.gateway.nginx.org  2026-03-05T10:00:00Z
Deploy NGINX Gateway Fabric:
kubectl apply -f https://raw.githubusercontent.com/nginx/nginx-gateway-fabric/v1.6.2/deploy/default/deploy.yaml
Wait for the controller to be ready:
kubectl wait --timeout=5m -n nginx-gateway \
    deployment/nginx-gateway \
    --for=condition=Available
The controller’s name may change in future releases, so if the above command fails, run the following to find the correct name:
kubectl get deployment -n nginx-gateway
Verify that the nginx GatewayClass is available:
kubectl get gatewayclass
The output should show the nginx GatewayClass in Accepted state:
NAME    CONTROLLER                                      ACCEPTED   AGE
nginx   gateway.nginx.org/nginx-gateway-controller      True       1m
7.2 Task 1: Design and deploy a public-facing application with path-based routing
Your team needs to expose two internal services to external users through a single entry point. The application consists of a main dashboard and an admin panel, each running as an independent Deployment. A Gateway sits in front of both Services and routes incoming traffic to the correct backend based on the request path: /dashboard for the main dashboard and /admin for the admin panel.
Each service must be reachable only within the cluster through a ClusterIP Service. The Gateway is the only component that accepts external traffic.
7.2.1 Architectural design
The task requires two independent applications reachable from outside the cluster through a single entry point, with path-based routing to direct traffic to the correct backend. Each application must remain internal (ClusterIP only), and only the Gateway accepts external traffic. These constraints drive four design decisions:
-
Each application runs as its own Deployment with one replica. Keeping the dashboard and the admin panel in separate Deployments means they can be scaled, updated, and rolled back independently. Each Deployment creates a ReplicaSet that manages a single Pod.
-
Each Deployment is connected with a ClusterIP Service (
dashboard-svcandadmin-svc) to provide a stable cluster-internal DNS name and load-balance traffic to the Pods. They accept requests on port80and forward them to the container port8080. Because ClusterIP has no external port, neither service is reachable from outside the cluster on its own. -
A Gateway resource (
app-gateway) is the single externally accessible component. It listens for HTTP traffic on port80and is backed by thenginxgateway. In bare-metal environments the controller exposes a NodePort Service, giving external clients a reachable port on the node IP. -
An HTTPRoute resource (
app-routes) binds to the Gateway and defines the path-based routing rules. Requests to/dashboardare forwarded todashboard-svc, and requests to/adminare forwarded toadmin-svc. A URL rewrite filter strips the path prefix before the request reaches the backend, so each application receives traffic at/regardless of the original path.
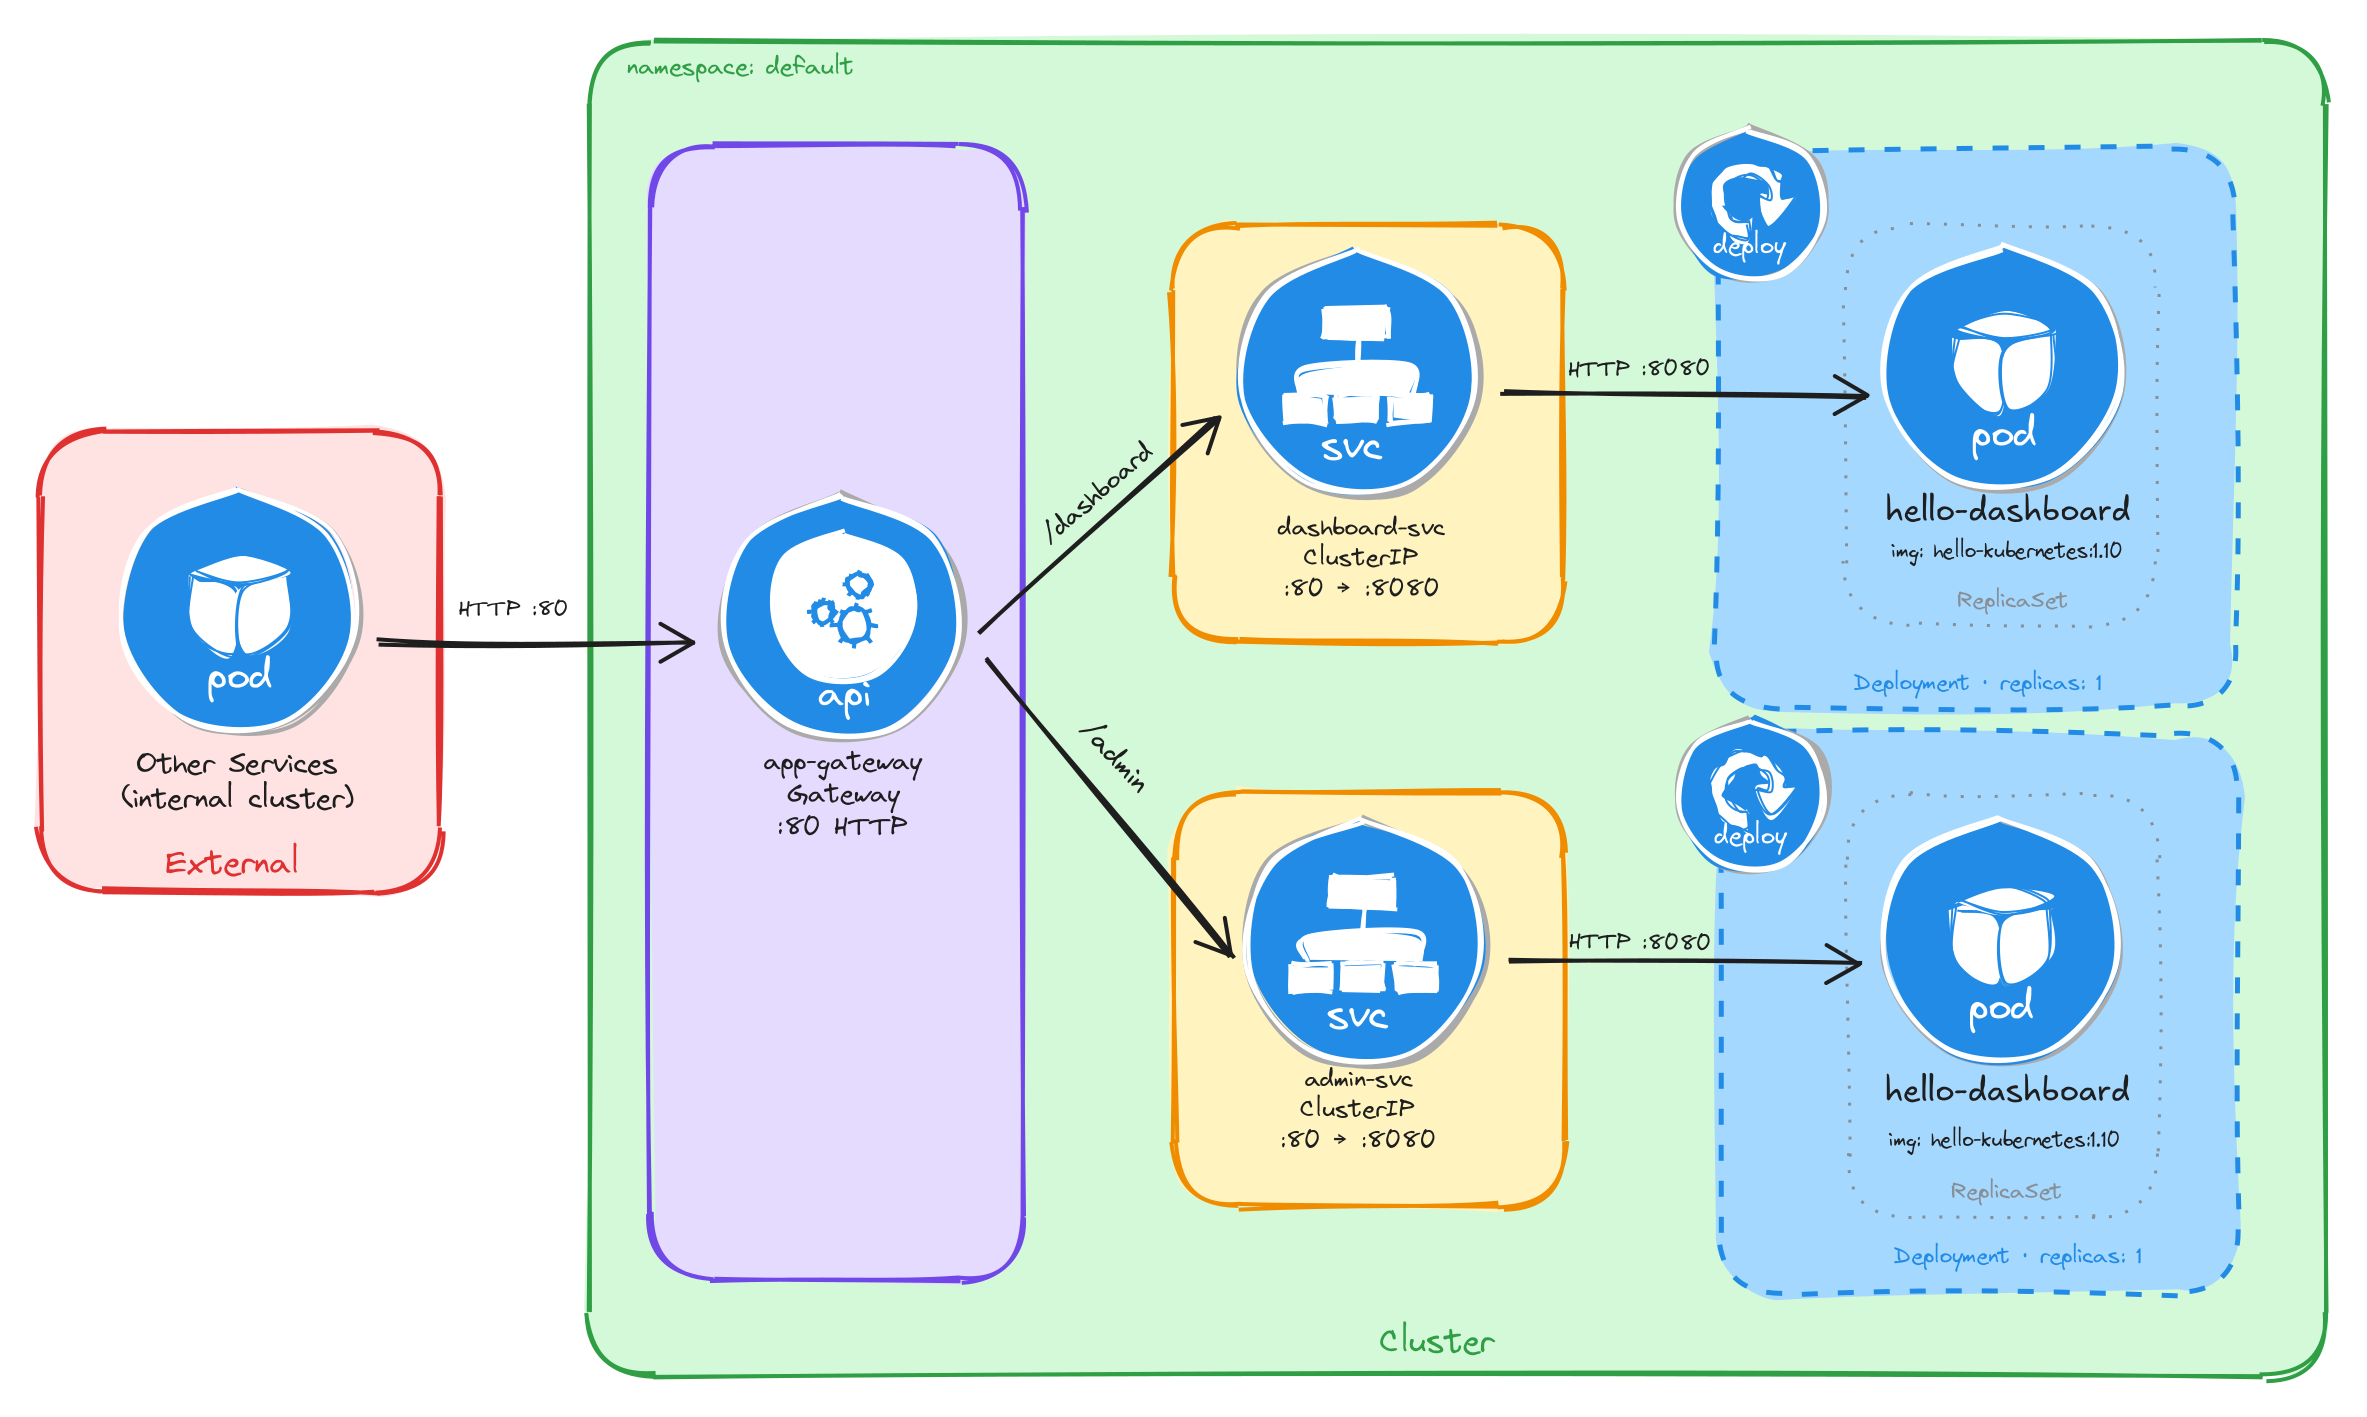
The diagram shows the resulting architecture: external clients send HTTP requests to the Gateway, which is the only component with an externally accessible port. The HTTPRoute inspects the request path and forwards traffic to the correct ClusterIP Service, which in turn reaches the Pod managed by the corresponding Deployment. The two application Services have no external route, so they are unreachable from outside the cluster without the Gateway.
7.2.2 Implementation
7.2.2.1 Deploy the applications
We start by creating the two Deployments. The MESSAGE environment variable sets a custom message in each hello-kubernetes instance, making it easy to distinguish which service is responding.
kubectl create deployment dashboard \
    --image=paulbouwer/hello-kubernetes:1.10 \
    --port=8080
kubectl set env deployment/dashboard MESSAGE="Main Dashboard"
kubectl create deployment admin \
    --image=paulbouwer/hello-kubernetes:1.10 \
    --port=8080
kubectl set env deployment/admin MESSAGE="Admin Panel"
Next, we expose each Deployment as a ClusterIP Service:
kubectl expose deployment dashboard \
    --name=dashboard-svc \
    --type=ClusterIP \
    --port=80 \
    --target-port=8080
kubectl expose deployment admin \
    --name=admin-svc \
    --type=ClusterIP \
    --port=80 \
    --target-port=8080
7.2.2.2 Create the gateway
We create a Gateway resource that listens for HTTP traffic on port 80. The gatewayClassName: nginx field references the GatewayClass provided by the installed Gateway controller:
cat <<EOF > gateway.yaml
With the following content:
apiVersion: gateway.networking.k8s.io/v1
kind: Gateway
metadata:
  name: app-gateway
spec:
  gatewayClassName: nginx
  listeners:
    - name: http
      protocol: HTTP
      port: 80
EOF
To verify the file was created correctly, run:
cat gateway.yaml
Apply the Gateway manifest:
kubectl apply -f gateway.yaml
7.2.2.3 Create the HTTP routes
We create an HTTPRoute resource that defines the path-based routing rules and binds them to the Gateway:
cat <<EOF > httproute.yaml
With the following content:
apiVersion: gateway.networking.k8s.io/v1
kind: HTTPRoute
metadata:
  name: app-routes
spec:
  parentRefs:
    - name: app-gateway
  rules:
    - matches:
        - path:
            type: PathPrefix
            value: /dashboard
      filters:
        - type: URLRewrite
          urlRewrite:
            path:
              type: ReplacePrefixMatch
              replacePrefixMatch: /
      backendRefs:
        - name: dashboard-svc
          port: 80
    - matches:
        - path:
            type: PathPrefix
            value: /admin
      filters:
        - type: URLRewrite
          urlRewrite:
            path:
              type: ReplacePrefixMatch
              replacePrefixMatch: /
      backendRefs:
        - name: admin-svc
          port: 80
EOF
A few things to note in this manifest:
- Parent reference:
parentRefsbinds this HTTPRoute to theapp-gatewayGateway, so the controller knows which Gateway should serve these routing rules. - Path-based routing: Each rule matches a path prefix and forwards traffic to the corresponding backend Service.
- URL rewrite filter: The
URLRewritefilter withReplacePrefixMatch: /strips the path prefix before forwarding the request to the backend, so the application receives requests at/regardless of the original path. For example, a request to/dashboard/homeis forwarded to the backend as/home, and a request to/dashboardis forwarded as/.
To verify the file was created correctly, run:
cat httproute.yaml
Apply the HTTPRoute manifest:
kubectl apply -f httproute.yaml
7.2.2.4 Verify resource creation
To verify that the Pods are running, execute:
kubectl get pods -l app=dashboard
kubectl get pods -l app=admin
The output for each should look similar to this:
NAME                         READY   STATUS    RESTARTS   AGE
dashboard-6bfbf8b67c-jv8tv   1/1     Running   0          1m
To verify that the Services are configured correctly, run:
kubectl get svc dashboard-svc admin-svc
The output should look similar to this:
NAME            TYPE        CLUSTER-IP     EXTERNAL-IP   PORT(S)   AGE
dashboard-svc   ClusterIP   10.96.45.12    <none>        80/TCP    1m
admin-svc       ClusterIP   10.96.78.34    <none>        80/TCP    1m
To verify that the Gateway is programmed, run:
kubectl get gateway app-gateway
The output should look similar to this:
NAME          CLASS   ADDRESS   PROGRAMMED   AGE
app-gateway   nginx             True         1m
Note: In bare-metal environments there is no cloud load balancer to assign an external IP, so the ADDRESS field will be empty. Traffic is still reachable through the node IP and the NodePort assigned to the Gateway Service.
To verify that the HTTPRoute is bound to the Gateway and accepted, run:
kubectl get httproute app-routes
The output should look similar to this:
NAME         HOSTNAMES   AGE
app-routes               1m
7.2.2.5 Test path-based routing
Store the node IP and the NodePort assigned to the Gateway Service in variables for convenience:
NODE_IP=$(kubectl get nodes \
    -o jsonpath='{.items[0].status.addresses[0].address}')
echo $NODE_IP
NODE_PORT=$(kubectl get svc -n nginx-gateway \
    -o jsonpath='{.items[0].spec.ports[0].nodePort}')
echo $NODE_PORT
Send a request to the /dashboard path:
curl -s http://$NODE_IP:$NODE_PORT/dashboard | grep -A2 'message'
The output should show the Main Dashboard message:
<div id="message">
  Main Dashboard
</div>
Send a request to the /admin path:
curl -s http://$NODE_IP:$NODE_PORT/admin | grep -A2 'message'
The output should show the Admin Panel message:
<div id="message">
  Admin Panel
</div>
This confirms that the Gateway is correctly routing requests to the appropriate backend Service based on the request path.
7.2.2.6 Verify that Services alone are not enough
ClusterIP Services are reachable within the cluster network, but they have no externally accessible port. To confirm this, compare the two Services against the Gateway Service:
kubectl get svc dashboard-svc admin-svc
kubectl get svc -n nginx-gateway
The output for the application Services will show ClusterIP type with no external IP and no NodePort:
NAME            TYPE        CLUSTER-IP     EXTERNAL-IP   PORT(S)   AGE
dashboard-svc   ClusterIP   10.96.45.12    <none>        80/TCP    5m
admin-svc       ClusterIP   10.96.78.34    <none>        80/TCP    5m
The Gateway Service, by contrast, exposes a NodePort that external clients can reach:
NAME            TYPE       CLUSTER-IP     EXTERNAL-IP   PORT(S)        AGE
nginx-gateway   NodePort   10.96.11.22    <none>        80:31234/TCP   5m
A client outside the cluster has no route to a ClusterIP address, so the application Services are unreachable from the outside regardless of whether they are running. The Gateway is the only component with an externally accessible port, and it acts as the single controlled entry point that forwards traffic to the correct internal Service based on the request path.
Note: If you are using the playground, running the command kubectl get svc -n nginx-gateway will show a LoadBalancer type with an external IP instead of NodePort, everything will still work the same.
7.2.2.7 Configure Killercoda port forwarding to access the application from the browser
If you are running this scenario in Killercoda, you can test the application from the terminal using curl as shown above, but you can also access it directly from the browser using Killercoda’s traffic forwarding feature.
Run the following command to forward the Gateway Service port to port 8080 on the node:
kubectl port-forward -n nginx-gateway svc/nginx-gateway 8080:80 --address 0.0.0.0
While the command is running, open the Killercoda traffic forwarding panel:
- Click the Traffic / Ports tab at the top of the Killercoda interface.
- Enter
8080in the port field and click Access.
A new browser tab will open pointing to the Killercoda-provided URL for port 8080. Append the path to the URL in the browser address bar to reach each service:
<killercoda-url>/dashboard— should display theMain Dashboardpage.<killercoda-url>/admin— should display theAdmin Panelpage.
To stop the port forwarding, press Ctrl+C in the terminal.
7.3 Task 2: Design and deploy a public-facing application with host-based routing
Your team needs to expose two internal microservices to external users through a single entry point. The application consists of an API service and a web frontend, each running as an independent Deployment. A Gateway sits in front of both Services and routes incoming traffic to the correct backend based on the request hostname: api.example.com for the API service and web.example.com for the web frontend.
Each service must be reachable only within the cluster through a ClusterIP Service. The Gateway is the only component that accepts external traffic.
7.3.1 Architectural design
The task requires two independent applications reachable from outside the cluster through a single entry point, with host-based routing to direct traffic to the correct backend. Each application must remain internal (ClusterIP only), and only the Gateway accepts external traffic. These constraints drive four design decisions:
-
Each application runs as its own Deployment with one replica. Keeping the API service and the web frontend in separate Deployments means they can be scaled, updated, and rolled back independently. Each Deployment creates a ReplicaSet that manages a single Pod.
-
Each Deployment is connected with a ClusterIP Service (
api-svcandweb-svc) to provide a stable cluster-internal DNS name and load-balance traffic to the Pods. They accept requests on port80and forward them to the container port8080. Because ClusterIP has no external port, neither service is reachable from outside the cluster on its own. -
A Gateway resource (
app-gateway) is the single externally accessible component. It listens for HTTP traffic on port80and is backed by thenginxgateway. In bare-metal environments the controller exposes a NodePort Service, giving external clients a reachable port on the node IP. -
Two HTTPRoute resources (
api-routeandweb-route) bind to the Gateway and define the host-based routing rules. Requests with theHostheader set toapi.example.comare forwarded toapi-svc, and requests with theHostheader set toweb.example.comare forwarded toweb-svc. Each HTTPRoute matches on a specific hostname instead of a path prefix, so the Gateway inspects theHostheader to decide which backend receives the request.

The diagram shows the resulting architecture: external clients send HTTP requests to the Gateway, which is the only component with an externally accessible port. The HTTPRoute resources inspect the request hostname and forward traffic to the correct ClusterIP Service, which in turn reaches the Pod managed by the corresponding Deployment. The two application Services have no external route, so they are unreachable from outside the cluster without the Gateway.
7.3.2 Implementation
7.3.2.1 Deploy the applications
We start by creating the two Deployments. The MESSAGE environment variable sets a custom message in each hello-kubernetes instance, making it easy to distinguish which service is responding.
kubectl create deployment api \
    --image=paulbouwer/hello-kubernetes:1.10 \
    --port=8080
kubectl set env deployment/api MESSAGE="API Service"
kubectl create deployment web \
    --image=paulbouwer/hello-kubernetes:1.10 \
    --port=8080
kubectl set env deployment/web MESSAGE="Web Frontend"
Next, we expose each Deployment as a ClusterIP Service:
kubectl expose deployment api \
    --name=api-svc \
    --type=ClusterIP \
    --port=80 \
    --target-port=8080
kubectl expose deployment web \
    --name=web-svc \
    --type=ClusterIP \
    --port=80 \
    --target-port=8080
7.3.2.2 Create the gateway
We create a Gateway resource that listens for HTTP traffic on port 80. The gatewayClassName: nginx field references the GatewayClass provided by the installed Gateway controller:
cat <<EOF > gateway.yaml
With the following content:
apiVersion: gateway.networking.k8s.io/v1
kind: Gateway
metadata:
  name: app-gateway
spec:
  gatewayClassName: nginx
  listeners:
    - name: http
      protocol: HTTP
      port: 80
EOF
To verify the file was created correctly, run:
cat gateway.yaml
Apply the Gateway manifest:
kubectl apply -f gateway.yaml
7.3.2.3 Create the HTTP routes
Unlike Task 1, where a single HTTPRoute with multiple path-based rules directed traffic to different backends, this task uses two separate HTTPRoute resources, each matching on a specific hostname. This approach maps naturally to host-based routing: each hostname corresponds to an independent application, so keeping the routes separate makes ownership and lifecycle management clearer.
We create the first HTTPRoute for the API service, matching requests with the Host header set to api.example.com:
cat <<EOF > api-route.yaml
With the following content:
apiVersion: gateway.networking.k8s.io/v1
kind: HTTPRoute
metadata:
  name: api-route
spec:
  parentRefs:
    - name: app-gateway
  hostnames:
    - api.example.com
  rules:
    - backendRefs:
        - name: api-svc
          port: 80
EOF
We create the second HTTPRoute for the web frontend, matching requests with the Host header set to web.example.com:
cat <<EOF > web-route.yaml
With the following content:
apiVersion: gateway.networking.k8s.io/v1
kind: HTTPRoute
metadata:
  name: web-route
spec:
  parentRefs:
    - name: app-gateway
  hostnames:
    - web.example.com
  rules:
    - backendRefs:
        - name: web-svc
          port: 80
EOF
A few things to note in these manifests:
- Parent reference:
parentRefsbinds each HTTPRoute to theapp-gatewayGateway, so the controller knows which Gateway should serve these routing rules. - Host-based routing: Each HTTPRoute matches on a specific hostname using the
hostnamesfield. The Gateway inspects theHostheader of incoming requests and forwards traffic to the HTTPRoute whose hostname matches. - No URL rewrite needed: Unlike path-based routing, host-based routing does not alter the request path, so the backend receives the request exactly as the client sent it. No
URLRewritefilter is required.
To verify the files were created correctly, run:
cat api-route.yaml
cat web-route.yaml
Apply both HTTPRoute manifests:
kubectl apply -f api-route.yaml
kubectl apply -f web-route.yaml
7.3.2.4 Verify resource creation
To verify that the Pods are running, execute:
kubectl get pods -l app=api
kubectl get pods -l app=web
The output for each should look similar to this:
NAME                   READY   STATUS    RESTARTS   AGE
api-7c4f8b6d9e-m3k2p   1/1     Running   0          1m
To verify that the Services are configured correctly, run:
kubectl get svc api-svc web-svc
The output should look similar to this:
NAME      TYPE        CLUSTER-IP     EXTERNAL-IP   PORT(S)   AGE
api-svc   ClusterIP   10.96.52.18    <none>        80/TCP    1m
web-svc   ClusterIP   10.96.89.41    <none>        80/TCP    1m
To verify that the Gateway is programmed, run:
kubectl get gateway app-gateway
The output should look similar to this:
NAME          CLASS   ADDRESS   PROGRAMMED   AGE
app-gateway   nginx             True         1m
Note: In bare-metal environments there is no cloud load balancer to assign an external IP, so the ADDRESS field will be empty. Traffic is still reachable through the node IP and the NodePort assigned to the Gateway Service.
To verify that both HTTPRoutes are bound to the Gateway and accepted, run:
kubectl get httproute api-route web-route
The output should look similar to this:
NAME        HOSTNAMES              AGE
api-route   ["api.example.com"]    1m
web-route   ["web.example.com"]    1m
7.3.2.5 Test host-based routing
Store the node IP and the NodePort assigned to the Gateway Service in variables for convenience:
NODE_IP=$(kubectl get nodes \
    -o jsonpath='{.items[0].status.addresses[0].address}')
echo $NODE_IP
NODE_PORT=$(kubectl get svc -n nginx-gateway \
    -o jsonpath='{.items[0].spec.ports[0].nodePort}')
echo $NODE_PORT
Send a request with the Host header set to api.example.com:
curl -s -H "Host: api.example.com" \
    http://$NODE_IP:$NODE_PORT/ | grep -A2 'message'
The output should show the API Service message:
<div id="message">
  API Service
</div>
Send a request with the Host header set to web.example.com:
curl -s -H "Host: web.example.com" \
    http://$NODE_IP:$NODE_PORT/ | grep -A2 'message'
The output should show the Web Frontend message:
<div id="message">
  Web Frontend
</div>
This confirms that the Gateway is correctly routing requests to the appropriate backend Service based on the request hostname.
7.3.2.6 Verify that Services alone are not enough
ClusterIP Services are reachable within the cluster network, but they have no externally accessible port. To confirm this, compare the two Services against the Gateway Service:
kubectl get svc api-svc web-svc
kubectl get svc -n nginx-gateway
The output for the application Services will show ClusterIP type with no external IP and no NodePort:
NAME      TYPE        CLUSTER-IP     EXTERNAL-IP   PORT(S)   AGE
api-svc   ClusterIP   10.96.52.18    <none>        80/TCP    5m
web-svc   ClusterIP   10.96.89.41    <none>        80/TCP    5m
The Gateway Service, by contrast, exposes a NodePort that external clients can reach:
NAME            TYPE       CLUSTER-IP     EXTERNAL-IP   PORT(S)        AGE
nginx-gateway   NodePort   10.96.11.22    <none>        80:31234/TCP   5m
A client outside the cluster has no route to a ClusterIP address, so the application Services are unreachable from the outside regardless of whether they are running. The Gateway is the only component with an externally accessible port, and it acts as the single controlled entry point that forwards traffic to the correct internal Service based on the request hostname.
Note: If you are using the playground, running the command kubectl get svc -n nginx-gateway will show a LoadBalancer type with an external IP instead of NodePort, everything will still work the same.
7.3.2.7 Configure Killercoda port forwarding to access the application from the browser
If you are running this scenario in Killercoda, you can test the application from the terminal using curl as shown above. However, accessing host-based routing from the browser requires the browser to send the correct Host header, which only happens when the hostname resolves to the Gateway’s address.
Run the following command to forward the Gateway Service port to port 8080 on the node:
kubectl port-forward -n nginx-gateway svc/nginx-gateway 8080:80 --address 0.0.0.0
While the command is running, you can test from another terminal using curl with the Host header pointing to localhost:
curl -s -H "Host: api.example.com" http://localhost:8080/ | grep -A2 'message'
curl -s -H "Host: web.example.com" http://localhost:8080/ | grep -A2 'message'
Note: Unlike path-based routing, host-based routing cannot be tested directly from the browser using the Killercoda-provided URL, because the browser sends the Killercoda hostname in the Host header, not api.example.com or web.example.com. To test from a browser, you would need to add entries to your local /etc/hosts file mapping both hostnames to the node IP, which is not possible in the Killercoda environment. The curl commands above are the recommended way to verify host-based routing in this setup.
To stop the port forwarding, press Ctrl+C in the terminal.