6 Resilient application deployment
Design and deploy an application and configure it to run with multiple replicas across the cluster.
This category includes the following learning objectives:
- Understanding of Pods.
- Understanding of Deployments.
- Understanding of ReplicaSets.
6.1 Task 1: Design and deploy a resilient web server with multiple replicas
Your team needs an internal web server that must remain available even when individual Pod instances fail or are rescheduled. The service must continue serving requests without manual intervention.
The web server must run as an nginx container with three replicas to ensure availability across failures. Other services inside the cluster need a stable address to reach it, but it must not be accessible from outside the cluster.
6.1.1 Architectural design
The task requires an internal web server that stays available across Pod failures without manual intervention, and must be reachable only from inside the cluster. These constraints drive three design decisions:
-
A Deployment with three replicas ensures the web server remains available even when individual Pods fail or are rescheduled. The Deployment creates a ReplicaSet that continuously reconciles the actual number of running Pods with the desired count. If a Pod crashes or is evicted, the ReplicaSet controller detects the mismatch and immediately schedules a replacement, restoring full capacity without manual intervention.
-
Other services need a stable address to reach the web server. Pod IPs change every time a Pod is recreated, and with three replicas there are three different IPs at any given moment. A ClusterIP Service (
nginx-resilient-svc) solves both problems: it provides a fixed cluster-internal DNS name and load-balances traffic across all healthy replicas, so callers are unaffected by individual Pod restarts or rescheduling. -
The web server must not be accessible from outside the cluster. A ClusterIP Service has no external port and no route from outside the cluster network, so it satisfies this requirement by design. No Gateway, Ingress, or NodePort is needed.
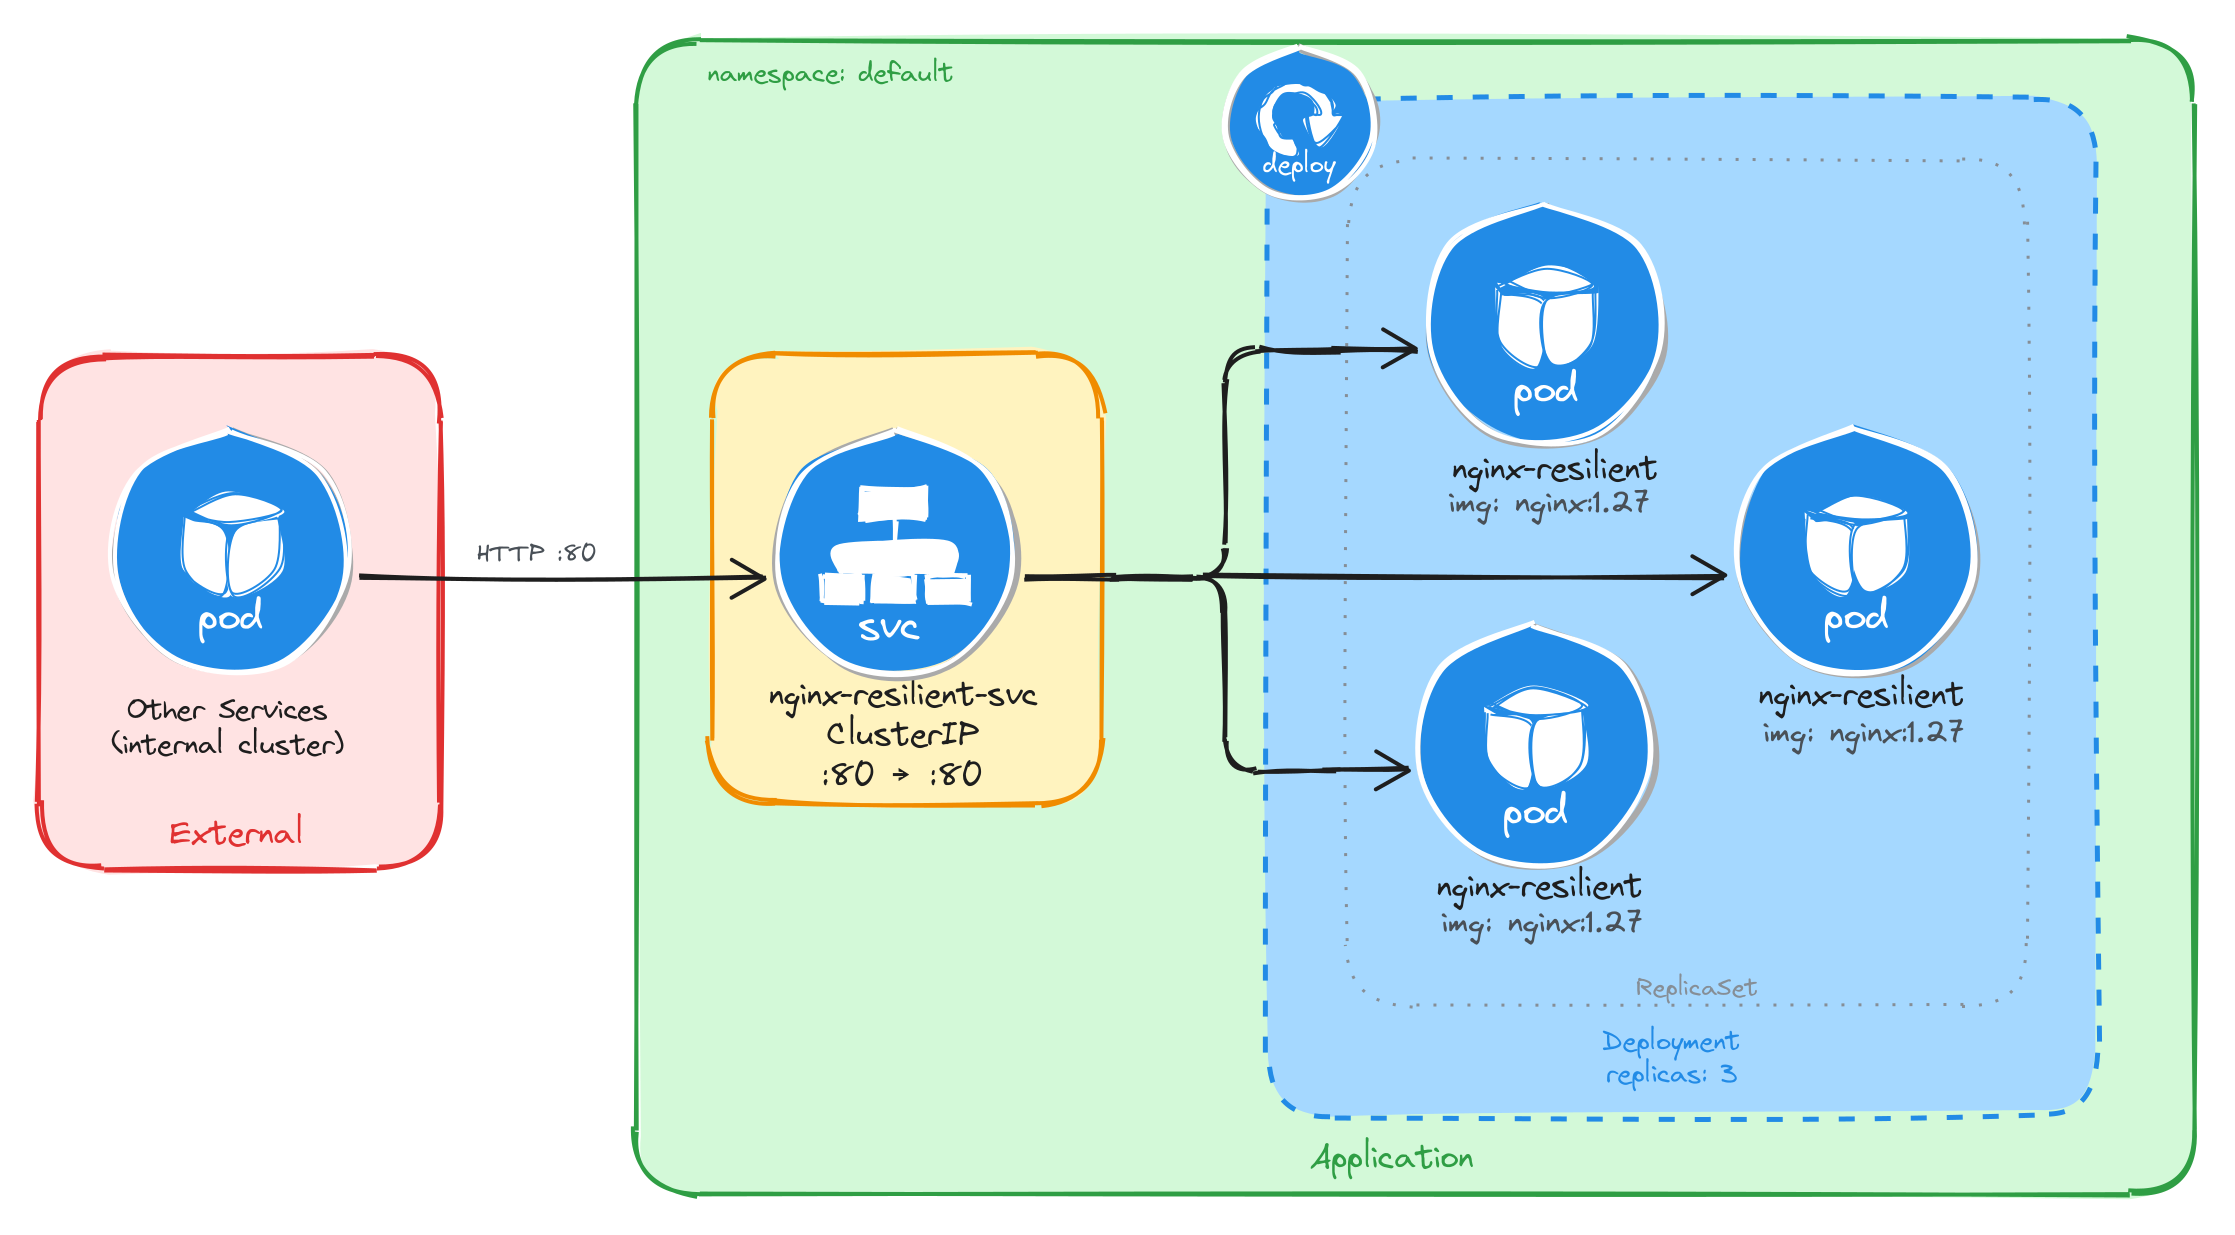
The diagram shows the resulting architecture: external clients have no path into the application, while internal services reach the web server through the ClusterIP Service, which load-balances traffic across the three Pod replicas managed by the Deployment’s ReplicaSet.
6.1.2 Implementation
We start by creating a Deployment with three replicas. The --replicas=3 flag tells the Deployment controller to keep three Pod instances running at all times. If a Pod crashes or is deleted, the controller will automatically create a replacement to restore the desired count.
kubectl create deployment nginx-resilient \
    --image=nginx:1.27 \
    --port=80 \
    --replicas=3
To inspect the YAML that would be applied without actually creating the resource, use the --dry-run=client -o yaml flags:
kubectl create deployment nginx-resilient \
    --image=nginx:1.27 \
    --port=80 \
    --replicas=3 \
    --dry-run=client -o yaml
The output should look similar to this:
apiVersion: apps/v1
kind: Deployment
metadata:
  creationTimestamp: null
  labels:
    app: nginx-resilient
  name: nginx-resilient
spec:
  replicas: 3
  selector:
    matchLabels:
      app: nginx-resilient
  strategy: {}
  template:
    metadata:
      creationTimestamp: null
      labels:
        app: nginx-resilient
    spec:
      containers:
      - image: nginx:1.27
        name: nginx
        ports:
        - containerPort: 80
        resources: {}
status: {}
Next, we expose the Deployment as a ClusterIP Service. The Service gives other cluster workloads a single stable address that load-balances across all three Pod replicas, so callers are unaffected by individual Pod restarts or rescheduling.
kubectl expose deployment nginx-resilient \
    --name=nginx-resilient-svc \
    --type=ClusterIP \
    --port=80 \
    --target-port=80
6.1.2.1 Verify resource creation
To verify that all three Pods are running, execute:
kubectl get pods -l app=nginx-resilient
The output should show three Pods in the Running state:
NAME                                READY   STATUS    RESTARTS   AGE
nginx-resilient-7d6b8f9c4d-4k2pq    1/1     Running   0          1m
nginx-resilient-7d6b8f9c4d-r9fxz    1/1     Running   0          1m
nginx-resilient-7d6b8f9c4d-tn8wl    1/1     Running   0          1m
To verify that the Service is configured correctly, run:
kubectl get svc nginx-resilient-svc
The output should look similar to this:
NAME                  TYPE        CLUSTER-IP     EXTERNAL-IP   PORT(S)   AGE
nginx-resilient-svc   ClusterIP   10.96.204.17   <none>        80/TCP    1m
6.1.2.2 Understand the Deployment, ReplicaSet, and Pod relationship
When a Deployment is created, Kubernetes automatically creates a ReplicaSet to manage the Pod instances. The Deployment owns the ReplicaSet, and the ReplicaSet owns the Pods. This three-level hierarchy is what makes self-healing possible: the ReplicaSet controller continuously reconciles the actual number of running Pods with the desired replica count specified in the Deployment.
To inspect the ReplicaSet that the Deployment created, run:
kubectl get replicasets -l app=nginx-resilient
The output should look similar to this:
NAME                          DESIRED   CURRENT   READY   AGE
nginx-resilient-7d6b8f9c4d    3         3         3       2m
The DESIRED, CURRENT, and READY columns all showing 3 confirms that the ReplicaSet has successfully started three Pod instances and all three are ready to serve traffic.
To inspect the full ownership chain from the Deployment down to a single Pod, run:
kubectl describe pod \
    $(kubectl get pods -l app=nginx-resilient \
        -o jsonpath='{.items[0].metadata.name}') \
    | grep 'Controlled By'
The output shows that the Pod is controlled by the ReplicaSet:
Controlled By: ReplicaSet/nginx-resilient-7d6b8f9c4d
6.1.2.3 Verify self-healing behavior
To verify that the Deployment automatically replaces failed Pods, delete one of the running Pods:
POD_NAME=$(kubectl get pods \
    -l app=nginx-resilient \
    -o jsonpath='{.items[0].metadata.name}') \
&& echo $POD_NAME
kubectl delete pod $POD_NAME
To observe the replacement in real time, open a second terminal and watch the Pods:
kubectl get pods -l app=nginx-resilient --watch
Then delete the Pod in the first terminal. The watch output will show the deleted Pod terminating while a new one is already being created to replace it:
NAME                                READY   STATUS              RESTARTS   AGE
nginx-resilient-7d6b8f9c4d-4k2pq    0/1     Terminating         0          5m
nginx-resilient-7d6b8f9c4d-r9fxz    1/1     Running             0          5m
nginx-resilient-7d6b8f9c4d-tn8wl    1/1     Running             0          5m
nginx-resilient-7d6b8f9c4d-x7bmc    0/1     ContainerCreating   0          2s
Within a few seconds, all three Pods will be running again:
NAME                                READY   STATUS    RESTARTS   AGE
nginx-resilient-7d6b8f9c4d-r9fxz    1/1     Running   0          6m
nginx-resilient-7d6b8f9c4d-tn8wl    1/1     Running   0          6m
nginx-resilient-7d6b8f9c4d-x7bmc    1/1     Running   0          30s
This behavior is driven by the ReplicaSet controller detecting that the actual Pod count (two) is less than the desired count (three) and immediately scheduling a replacement.
6.1.2.4 Test the web server
To test that the Service correctly load-balances across the replicas, create a temporary Pod and send a request through the Service:
kubectl run -it --rm --restart=Never busybox --image=busybox sh
Inside the busybox Pod, use wget to send several requests through the Service:
for i in $(seq 1 9); do
    wget -qO- http://nginx-resilient-svc > /dev/null \
        && echo "request $i done"
done
Exit the busybox Pod, then check the access logs of each nginx replica:
for pod in $(kubectl get pods -l app=nginx-resilient -o name); do
    echo "=== $pod ==="
    kubectl logs $pod | grep "GET /"
done
The output shows each Pod’s access log with only the requests it handled, confirming that the Service distributed traffic across all three replicas:
=== pod/nginx-resilient-7d6b8f9c4d-r9fxz ===
10.244.0.12 - - [05/Mar/2026:10:30:00 +0000] "GET / HTTP/1.1" 200 615 "-" "Wget"
10.244.0.12 - - [05/Mar/2026:10:30:01 +0000] "GET / HTTP/1.1" 200 615 "-" "Wget"
10.244.0.12 - - [05/Mar/2026:10:30:02 +0000] "GET / HTTP/1.1" 200 615 "-" "Wget"
=== pod/nginx-resilient-7d6b8f9c4d-tn8wl ===
10.244.0.12 - - [05/Mar/2026:10:30:01 +0000] "GET / HTTP/1.1" 200 615 "-" "Wget"
10.244.0.12 - - [05/Mar/2026:10:30:03 +0000] "GET / HTTP/1.1" 200 615 "-" "Wget"
10.244.0.12 - - [05/Mar/2026:10:30:04 +0000] "GET / HTTP/1.1" 200 615 "-" "Wget"
=== pod/nginx-resilient-7d6b8f9c4d-x7bmc ===
10.244.0.12 - - [05/Mar/2026:10:30:02 +0000] "GET / HTTP/1.1" 200 615 "-" "Wget"
10.244.0.12 - - [05/Mar/2026:10:30:03 +0000] "GET / HTTP/1.1" 200 615 "-" "Wget"
10.244.0.12 - - [05/Mar/2026:10:30:05 +0000] "GET / HTTP/1.1" 200 615 "-" "Wget"
The Service acts as a stable endpoint regardless of how many Pods are running at any given moment, which means callers never need to track individual Pod IPs.
6.2 Task 2: Design and deploy a resilient API service with multiple replicas
Your team needs an internal API service that returns runtime metadata about the application. It must remain available even when individual Pod instances fail or are rescheduled, and the service must continue responding to requests without manual intervention.
The API service must run as a podinfo container with four replicas to ensure high availability across failures. Other services inside the cluster need a stable address to reach it, but it must not be accessible from outside the cluster.
6.2.1 Architectural design
The task requires an internal API service that stays available across Pod failures without manual intervention, and must be reachable only from inside the cluster. These constraints drive three design decisions:
-
A Deployment with four replicas ensures the API service remains available even when individual Pods fail or are rescheduled. The Deployment creates a ReplicaSet that continuously reconciles the actual number of running Pods with the desired count. If a Pod crashes or is evicted, the ReplicaSet controller detects the mismatch and immediately schedules a replacement, restoring full capacity without manual intervention.
-
Other services need a stable address to reach the API service. Pod IPs change every time a Pod is recreated, and with four replicas there are four different IPs at any given moment. A ClusterIP Service (
podinfo-resilient-svc) solves both problems: it provides a fixed cluster-internal DNS name and load-balances traffic across all healthy replicas, so callers are unaffected by individual Pod restarts or rescheduling. -
The API service must not be accessible from outside the cluster. A ClusterIP Service has no external port and no route from outside the cluster network, so it satisfies this requirement by design. No Gateway, Ingress, or NodePort is needed.
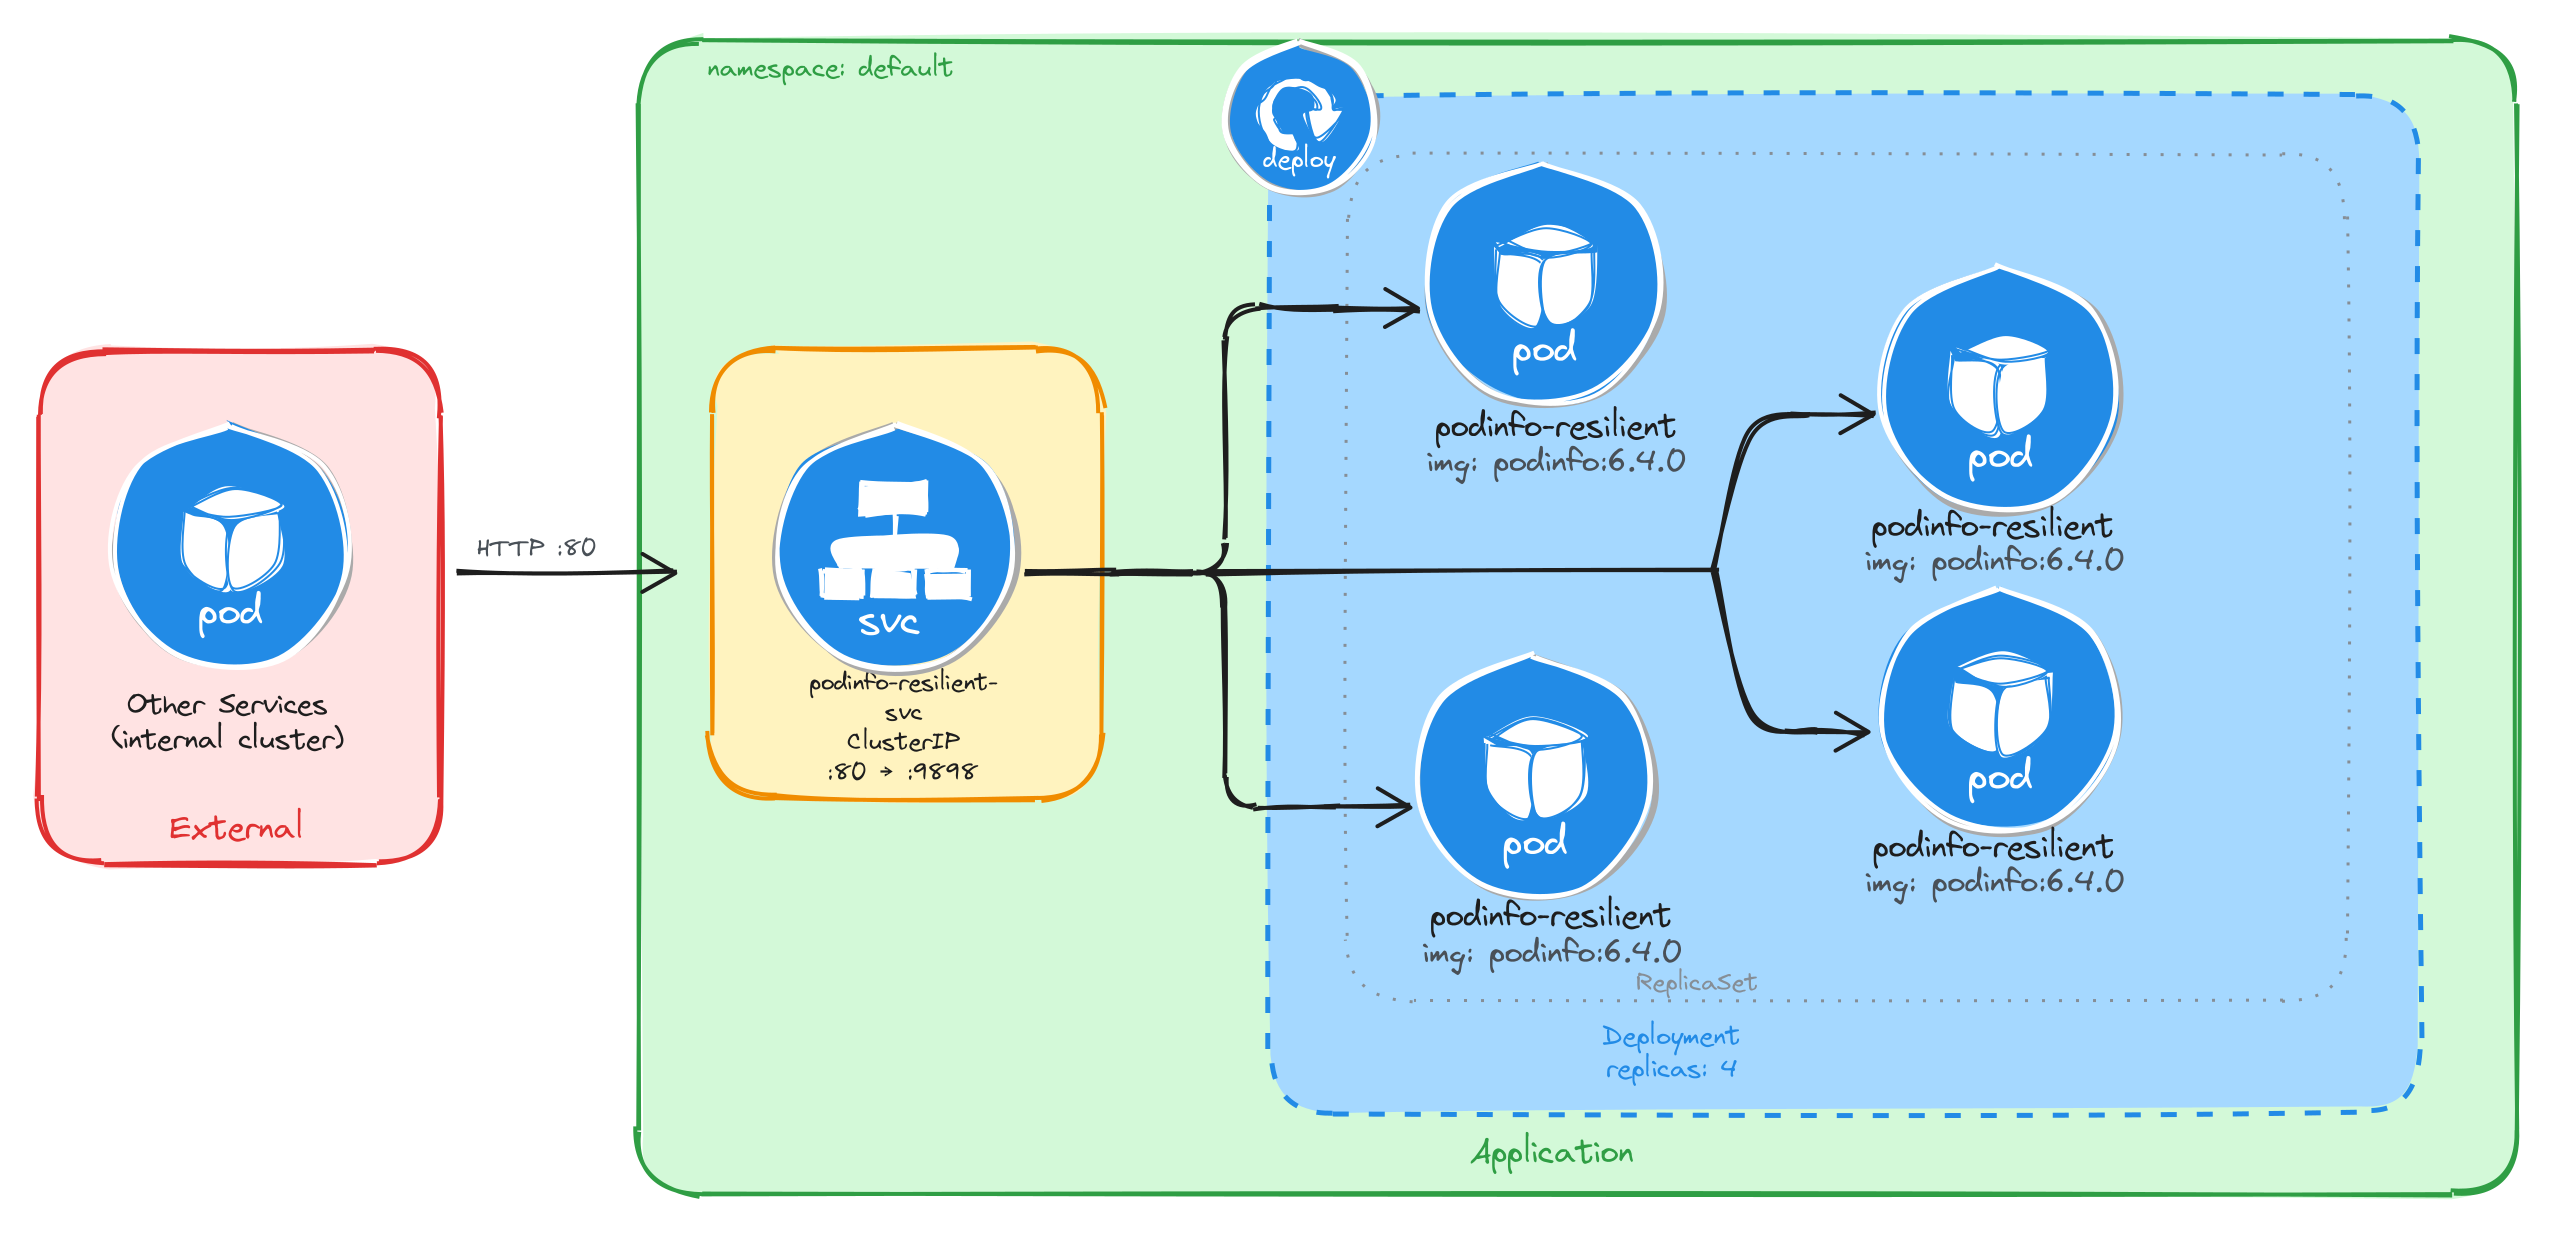
The diagram shows the resulting architecture: external clients have no path into the application, while internal services reach the API service through the ClusterIP Service, which load-balances traffic across the four Pod replicas managed by the Deployment’s ReplicaSet.
6.2.2 Implementation
We start by creating a Deployment with four replicas. The --replicas=4 flag tells the Deployment controller to keep four Pod instances running at all times. If a Pod crashes or is deleted, the controller will automatically create a replacement to restore the desired count.
kubectl create deployment podinfo-resilient \
    --image=stefanprodan/podinfo:6.4.0 \
    --port=9898 \
    --replicas=4
To inspect the YAML that would be applied without actually creating the resource, use the --dry-run=client -o yaml flags:
kubectl create deployment podinfo-resilient \
    --image=stefanprodan/podinfo:6.4.0 \
    --port=9898 \
    --replicas=4 \
    --dry-run=client -o yaml
The output should look similar to this:
apiVersion: apps/v1
kind: Deployment
metadata:
  creationTimestamp: null
  labels:
    app: podinfo-resilient
  name: podinfo-resilient
spec:
  replicas: 4
  selector:
    matchLabels:
      app: podinfo-resilient
  strategy: {}
  template:
    metadata:
      creationTimestamp: null
      labels:
        app: podinfo-resilient
    spec:
      containers:
      - image: stefanprodan/podinfo:6.4.0
        name: podinfo
        ports:
        - containerPort: 9898
        resources: {}
status: {}
Next, we expose the Deployment as a ClusterIP Service. The Service gives other cluster workloads a single stable address that load-balances across all four Pod replicas, so callers are unaffected by individual Pod restarts or rescheduling.
kubectl expose deployment podinfo-resilient \
    --name=podinfo-resilient-svc \
    --type=ClusterIP \
    --port=80 \
    --target-port=9898
6.2.2.1 Verify resource creation
To verify that all four Pods are running, execute:
kubectl get pods -l app=podinfo-resilient
The output should show four Pods in the Running state:
NAME                                  READY   STATUS    RESTARTS   AGE
podinfo-resilient-5b8c7d9f64-2k8np    1/1     Running   0          1m
podinfo-resilient-5b8c7d9f64-7r3qw    1/1     Running   0          1m
podinfo-resilient-5b8c7d9f64-d4x9m    1/1     Running   0          1m
podinfo-resilient-5b8c7d9f64-p6v2t    1/1     Running   0          1m
To verify that the Service is configured correctly, run:
kubectl get svc podinfo-resilient-svc
The output should look similar to this:
NAME                    TYPE        CLUSTER-IP     EXTERNAL-IP   PORT(S)   AGE
podinfo-resilient-svc   ClusterIP   10.96.178.35   <none>        80/TCP    1m
6.2.2.2 Understand the Deployment, ReplicaSet, and Pod relationship
When a Deployment is created, Kubernetes automatically creates a ReplicaSet to manage the Pod instances. The Deployment owns the ReplicaSet, and the ReplicaSet owns the Pods. This three-level hierarchy is what makes self-healing possible: the ReplicaSet controller continuously reconciles the actual number of running Pods with the desired replica count specified in the Deployment.
To inspect the ReplicaSet that the Deployment created, run:
kubectl get replicasets -l app=podinfo-resilient
The output should look similar to this:
NAME                            DESIRED   CURRENT   READY   AGE
podinfo-resilient-5b8c7d9f64    4         4         4       2m
The DESIRED, CURRENT, and READY columns all showing 4 confirms that the ReplicaSet has successfully started four Pod instances and all four are ready to serve traffic.
To inspect the full ownership chain from the Deployment down to a single Pod, run:
kubectl describe pod \
    $(kubectl get pods -l app=podinfo-resilient \
        -o jsonpath='{.items[0].metadata.name}') \
    | grep 'Controlled By'
The output shows that the Pod is controlled by the ReplicaSet:
Controlled By: ReplicaSet/podinfo-resilient-5b8c7d9f64
6.2.2.3 Verify self-healing behavior
To verify that the Deployment automatically replaces failed Pods, delete one of the running Pods:
POD_NAME=$(kubectl get pods \
    -l app=podinfo-resilient \
    -o jsonpath='{.items[0].metadata.name}') \
&& echo $POD_NAME
kubectl delete pod $POD_NAME
To observe the replacement in real time, open a second terminal and watch the Pods:
kubectl get pods -l app=podinfo-resilient --watch
Then delete the Pod in the first terminal. The watch output will show the deleted Pod terminating while a new one is already being created to replace it:
NAME                                  READY   STATUS              RESTARTS   AGE
podinfo-resilient-5b8c7d9f64-2k8np    0/1     Terminating         0          5m
podinfo-resilient-5b8c7d9f64-7r3qw    1/1     Running             0          5m
podinfo-resilient-5b8c7d9f64-d4x9m    1/1     Running             0          5m
podinfo-resilient-5b8c7d9f64-p6v2t    1/1     Running             0          5m
podinfo-resilient-5b8c7d9f64-h9c3f    0/1     ContainerCreating   0          2s
Within a few seconds, all four Pods will be running again:
NAME                                  READY   STATUS    RESTARTS   AGE
podinfo-resilient-5b8c7d9f64-7r3qw    1/1     Running   0          6m
podinfo-resilient-5b8c7d9f64-d4x9m    1/1     Running   0          6m
podinfo-resilient-5b8c7d9f64-p6v2t    1/1     Running   0          6m
podinfo-resilient-5b8c7d9f64-h9c3f    1/1     Running   0          30s
This behavior is driven by the ReplicaSet controller detecting that the actual Pod count (three) is less than the desired count (four) and immediately scheduling a replacement.
6.2.2.4 Test the API service
To test that the Service correctly load-balances across the replicas, create a temporary Pod and send a request through the Service:
kubectl run -it --rm --restart=Never busybox --image=busybox sh
Inside the busybox Pod, use wget to send several requests through the Service and observe which Pod handles each one. The podinfo container returns a JSON response that includes a hostname field set to the Pod name:
for i in $(seq 1 8); do
    wget -qO- http://podinfo-resilient-svc \
        | grep '"hostname"'
done
The output should show different Pod names across the requests, confirming that the Service distributes traffic across all four replicas:
"hostname": "podinfo-resilient-5b8c7d9f64-7r3qw",
"hostname": "podinfo-resilient-5b8c7d9f64-d4x9m",
"hostname": "podinfo-resilient-5b8c7d9f64-p6v2t",
"hostname": "podinfo-resilient-5b8c7d9f64-h9c3f",
"hostname": "podinfo-resilient-5b8c7d9f64-7r3qw",
"hostname": "podinfo-resilient-5b8c7d9f64-d4x9m",
"hostname": "podinfo-resilient-5b8c7d9f64-p6v2t",
"hostname": "podinfo-resilient-5b8c7d9f64-h9c3f",
Each hostname value corresponds to a different Pod, showing that the Service load-balances across all four replicas. The Service acts as a stable endpoint regardless of how many Pods are running at any given moment, which means callers never need to track individual Pod IPs.