4 Multi-container deployment
Design and deploy a Pod with sidecar containers and a service for internal access.
This category includes the following learning objectives:
- Understanding of Pods.
- Understanding of Deployments.
- Knowledge of multi-container pod patterns and container lifecycle.
- Understanding of shared volumes between containers.
4.1 Task 1: Design and deploy a web server with a logging sidecar
Your team needs an internal web server that serves a static page inside the cluster. The operations team also requires real-time visibility into the access logs of the web server without having to exec into the running container.
The web server must run as an nginx container. A second container running busybox must act as a logging sidecar that continuously reads the nginx access log and prints it to its own standard output.
The web server must be reachable from other services inside the cluster through a stable address, but it must not be accessible from outside the cluster.
4.1.1 Architectural design
The task requires two containers that share log data, brief downtime is acceptable, and the web server must be reachable only from inside the cluster. These constraints drive four design decisions:
-
A single Deployment with one replica is enough because the application needs two containers in the same Pod, the nginx web server and the busybox logging sidecar. The Deployment creates a ReplicaSet that manages the Pod. If the Pod crashes, the ReplicaSet recreates it automatically at the cost of a short period of unavailability, which the task explicitly allows.
-
The sidecar needs access to nginx’s access logs without execing into the nginx container. A volume mounted at
/var/log/nginxlocation in both containers solves this: nginx writes its access log to the shared volume, and the sidecar continuously reads it withtail -f, streaming entries to its own standard output. This keeps the two containers decoupled: each has a single responsibility and the shared volume acts as the data bridge between them. -
Other services need a stable address to reach the web server. Pod IPs change every time a Pod is recreated, so we place a ClusterIP Service (
nginx-sidecar-svc) in front of the Pod. The Service provides a fixed cluster-internal DNS name and forwards traffic to the nginx container on port80. -
The web server must not be accessible from outside the cluster. A ClusterIP Service has no external port and no route from outside the cluster network, so it satisfies this requirement by design. No Gateway, Ingress, or NodePort is needed.

The diagram shows the resulting architecture: external clients have no path into the application, while internal services reach the web server through the ClusterIP Service, which forwards traffic into the Pod managed by the Deployment. Inside the Pod, the nginx container serves requests and writes access logs to a shared volume, which the logging sidecar reads and streams to standard output.
4.1.2 Implementation
Unlike single-container Pods, multi-container Pods cannot be created with kubectl create deployment alone. We need a YAML manifest to define both containers and the shared volume within the same Pod.
We start by creating a file called nginx-with-sidecar.yaml:
cat <<EOF > nginx-with-sidecar.yaml
With the following content:
apiVersion: apps/v1
kind: Deployment
metadata:
  name: nginx-with-sidecar
  labels:
    app: nginx-with-sidecar
spec:
  replicas: 1
  selector:
    matchLabels:
      app: nginx-with-sidecar
  template:
    metadata:
      labels:
        app: nginx-with-sidecar
    spec:
      containers:
        - name: nginx
          image: nginx:1.27
          ports:
            - containerPort: 80
          volumeMounts:
            - name: logs
              mountPath: /var/log/nginx
        - name: log-sidecar
          image: busybox:1.37
          command:
            - sh
            - -c
            - tail -f /var/log/nginx/access.log
          volumeMounts:
            - name: logs
              mountPath: /var/log/nginx
      volumes:
        - name: logs
          emptyDir: {}
EOF
There are a few things to note in this manifest:
- Shared volume: An
emptyDirvolume calledlogsis mounted at/var/log/nginxin both containers. This is how the sidecar reads the log files written by nginx. AnemptyDirvolume is created when the Pod is assigned to a node and exists as long as the Pod is running on that node, making it ideal for sharing temporary data between containers in the same Pod. - Sidecar container: The
log-sidecarcontainer runstail -fon the nginx access log. This means it will continuously stream new log entries to its standard output, where they can be read withkubectl logs. - Single replica: One replica is enough since brief unavailability is acceptable.
To verify the file was created correctly, run:
cat nginx-with-sidecar.yaml
Apply the manifest to create the Deployment:
kubectl apply -f nginx-with-sidecar.yaml
Next, we expose the Deployment as a ClusterIP Service. The Service listens on port 80 and forwards traffic to the nginx container port 80.
kubectl expose deployment nginx-with-sidecar \
    --name=nginx-sidecar-svc \
    --type=ClusterIP \
    --port=80 \
    --target-port=80
4.1.2.1 Verify resource creation
To verify that the Pod is running and that both containers are ready, execute the following command:
kubectl get pods -l app=nginx-with-sidecar --watch
The output should look similar to this. Notice that the READY column shows 2/2, confirming that both the nginx container and the log-sidecar container are running:
NAME                                  READY   STATUS    RESTARTS   AGE
nginx-with-sidecar-5d4f7b8c9a-k2m8n   2/2     Running   0          2m
To verify that the Service is configured correctly, run:
kubectl get svc nginx-sidecar-svc
The output should look similar to this:
NAME                TYPE        CLUSTER-IP      EXTERNAL-IP   PORT(S)   AGE
nginx-sidecar-svc   ClusterIP   10.96.145.203   <none>        80/TCP    1m
4.1.2.2 Test the web server
To test the web server, create a temporary Pod and send a request through the Service:
kubectl run -it --rm --restart=Never busybox --image=busybox sh
Inside the busybox Pod, use wget to access the web server through the Service ClusterIP:
wget -qO- http://nginx-sidecar-svc
The response should be the default nginx welcome page:
<!DOCTYPE html>
<html>
    <head>
        <title>Welcome to nginx!</title>
        <!-- CSS styles omitted for brevity -->
    </head>
    <body>
        <h1>Welcome to nginx!</h1>
        <p>If you see this page, the nginx web server is successfully installed and
        working. Further configuration is required.</p>
        <!-- Content omitted for brevity -->
    </body>
</html>
4.1.2.3 Verify the sidecar logs
After sending the request above, exit the busybox Pod and verify that the sidecar captured the access log entry. First, get the Pod name:
POD_NAME=$(kubectl get pods \
    -l app=nginx-with-sidecar \
    -o jsonpath='{.items[0].metadata.name}') \
&& echo $POD_NAME
Then, read the logs from the log-sidecar container using the -c flag to specify which container to read from:
kubectl logs $POD_NAME -c log-sidecar
The output should show the access log entry from the request we made through the busybox Pod:
10.244.0.12 - - [05/Mar/2026:10:30:00 +0000] "GET / HTTP/1.1" 200 615 "-" "Wget"
This confirms that the sidecar pattern is working correctly: nginx writes logs to the shared volume, and the sidecar reads and exposes them through its standard output.
4.2 Task 2: Design and deploy a web server with an error monitoring sidecar
Your team needs an internal documentation portal that serves static content inside the cluster. The security team requires continuous monitoring of all error events generated by the web server for audit compliance, without modifying the web server configuration or accessing its container directly.
The web server must run as an httpd (Apache) container. A second container running busybox must act as an error monitoring sidecar that continuously reads the httpd error log and prints it to its own standard output.
The web server must be reachable from other services inside the cluster through a stable address, but it must not be accessible from outside the cluster.
4.2.1 Architectural design
The task requires two containers that share error log data, brief downtime is acceptable, and the web server must be reachable only from inside the cluster. These constraints drive four design decisions:
-
A single Deployment with one replica is enough because the application needs two containers in the same Pod, the httpd web server and the busybox error monitoring sidecar. The Deployment creates a ReplicaSet that manages the Pod. If the Pod crashes, the ReplicaSet recreates it automatically at the cost of a short period of unavailability, which the task explicitly allows.
-
The sidecar needs access to httpd’s error logs without execing into the httpd container. A volume mounted at
/usr/local/apache2/logslocation in both containers solves this: httpd writes its error log to the shared volume, and the sidecar continuously reads it withtail -f, streaming entries to its own standard output. This keeps the two containers decoupled: each has a single responsibility and the shared volume acts as the data bridge between them. -
Other services need a stable address to reach the web server. Pod IPs change every time a Pod is recreated, so we place a ClusterIP Service (
httpd-monitor-svc) in front of the Pod. The Service provides a fixed cluster-internal DNS name and forwards traffic to the httpd container on port80. -
The web server must not be accessible from outside the cluster. A ClusterIP Service has no external port and no route from outside the cluster network, so it satisfies this requirement by design. No Gateway, Ingress, or NodePort is needed.

The diagram shows the resulting architecture: external clients have no path into the application, while internal services reach the web server through the ClusterIP Service, which forwards traffic into the Pod managed by the Deployment. Inside the Pod, the httpd container serves requests and writes error logs to a shared volume, which the error monitoring sidecar reads and streams to standard output.
4.2.2 Implementation
Unlike single-container Pods, multi-container Pods cannot be created with kubectl create deployment alone. We need a YAML manifest to define both containers and the shared volume within the same Pod.
We start by creating a file called httpd-with-monitor.yaml:
cat <<EOF > httpd-with-monitor.yaml
With the following content:
apiVersion: apps/v1
kind: Deployment
metadata:
  name: httpd-with-monitor
  labels:
    app: httpd-with-monitor
spec:
  replicas: 1
  selector:
    matchLabels:
      app: httpd-with-monitor
  template:
    metadata:
      labels:
        app: httpd-with-monitor
    spec:
      containers:
        - name: httpd
          image: httpd:2.4
          command:
            - sh
            - -c
            - |
              sed -i 's|ErrorLog /proc/self/fd/2|ErrorLog logs/error_log|' \
                /usr/local/apache2/conf/httpd.conf
              httpd-foreground
          ports:
            - containerPort: 80
          volumeMounts:
            - name: logs
              mountPath: /usr/local/apache2/logs
        - name: error-monitor
          image: busybox:1.37
          command:
            - sh
            - -c
            - |
              until [ -f /usr/local/apache2/logs/error_log ]; do sleep 1; done
              tail -f /usr/local/apache2/logs/error_log
          volumeMounts:
            - name: logs
              mountPath: /usr/local/apache2/logs
      volumes:
        - name: logs
          emptyDir: {}
EOF
There are a few things to note in this manifest:
- Shared volume: An
emptyDirvolume calledlogsis mounted at/usr/local/apache2/logsin both containers. This is how the sidecar reads the log files written by httpd. AnemptyDirvolume is created when the Pod is assigned to a node and exists as long as the Pod is running on that node, making it ideal for sharing temporary data between containers in the same Pod. - httpd command override: The official
httpd:2.4Docker image configuresErrorLog /proc/self/fd/2, which redirects error logs to stderr instead of writing them to a file. The sidecar reads from the shared volume, so it needs a file. The httpd container’s command usessedto rewrite that directive toErrorLog logs/error_logbefore startinghttpd-foreground, making httpd write error logs to the shared volume where the sidecar can read them. - Sidecar container: The
error-monitorcontainer first waits forerror_logto exist as httpd only creates the file on startup, and theemptyDirvolume starts empty, sotail -fwould fail immediately without this guard. Once the file appears, it continuously streams new log entries to its standard output, where they can be read withkubectl logs. - Single replica: One replica is enough since brief unavailability is acceptable.
To verify the file was created correctly, run:
cat httpd-with-monitor.yaml
Apply the manifest to create the Deployment:
kubectl apply -f httpd-with-monitor.yaml
Next, we expose the Deployment as a ClusterIP Service. The Service listens on port 80 and forwards traffic to the httpd container port 80.
kubectl expose deployment httpd-with-monitor \
    --name=httpd-monitor-svc \
    --type=ClusterIP \
    --port=80 \
    --target-port=80
4.2.2.1 Verify resource creation
To verify that the Pod is running and that both containers are ready, execute the following command:
kubectl get pods -l app=httpd-with-monitor --watch
The output should look similar to this. Notice that the READY column shows 2/2, confirming that both the httpd container and the error-monitor container are running:
NAME                                  READY   STATUS    RESTARTS   AGE
httpd-with-monitor-6b7f9c2d1e-x4p3q   2/2     Running   0          2m
To verify that the Service is configured correctly, run:
kubectl get svc httpd-monitor-svc
The output should look similar to this:
NAME                TYPE        CLUSTER-IP      EXTERNAL-IP   PORT(S)   AGE
httpd-monitor-svc   ClusterIP   10.96.178.42    <none>        80/TCP    1m
4.2.2.2 Test the web server
To test the web server, create a temporary Pod and send a request through the Service:
kubectl run -it --rm --restart=Never busybox --image=busybox sh
Inside the busybox Pod, use wget to access the web server through the Service ClusterIP:
wget -qO- http://httpd-monitor-svc
The response should be the default Apache welcome page:
<html>
    <body>
        <h1>It works!</h1>
    </body>
</html>
4.2.2.3 Verify the sidecar logs
After sending the request above, exit the busybox Pod and verify that the sidecar captured the error log entries. First, get the Pod name:
POD_NAME=$(kubectl get pods \
    -l app=httpd-with-monitor \
    -o jsonpath='{.items[0].metadata.name}') \
&& echo $POD_NAME
Then, read the logs from the error-monitor container using the -c flag to specify which container to read from:
kubectl logs $POD_NAME -c error-monitor
The output should show error log entries from the httpd server, including startup messages and any request processing events:
[Wed Mar 05 10:30:00.000000 2026] [mpm_event:notice] [pid 1:tid 1] AH00489: Apache/2.4.62 (Unix) configured -- resuming normal operations
[Wed Mar 05 10:30:00.000000 2026] [core:notice] [pid 1:tid 1] AH00094: Command line: 'httpd -D FOREGROUND'
This confirms that the sidecar pattern is working correctly: httpd writes error logs to the shared volume, and the sidecar reads and exposes them through its standard output.
4.3 Task 3: Design and deploy a Java application server with an access logging sidecar
Your team needs an internal Java application server that hosts backend services inside the cluster. The platform team requires a dedicated stream of HTTP access logs from the application server for traffic analysis and capacity planning, without modifying the server configuration or accessing its container directly.
The application server must run as a tomcat container. A second container running busybox must act as an access logging sidecar that continuously reads the Tomcat access log and prints it to its own standard output.
The application server must be reachable from other services inside the cluster through a stable address, but it must not be accessible from outside the cluster.
4.3.1 Architectural design
The task requires two containers that share access log data, brief downtime is acceptable, and the application server must be reachable only from inside the cluster. These constraints drive four design decisions:
-
A single Deployment with one replica is enough because the application needs two containers in the same Pod, the Tomcat application server and the busybox access logging sidecar. The Deployment creates a ReplicaSet that manages the Pod. If the Pod crashes, the ReplicaSet recreates it automatically at the cost of a short period of unavailability, which the task explicitly allows.
-
The sidecar needs access to Tomcat’s access logs without execing into the Tomcat container. A volume mounted at
/usr/local/tomcat/logslocation in both containers solves this: Tomcat writes its access log to the shared volume, and the sidecar continuously reads it withtail -f, streaming entries to its own standard output. This keeps the two containers decoupled: each has a single responsibility and the shared volume acts as the data bridge between them. -
Other services need a stable address to reach the application server. Pod IPs change every time a Pod is recreated, so we place a ClusterIP Service (
tomcat-logger-svc) in front of the Pod. The Service provides a fixed cluster-internal DNS name and forwards traffic on port80to the Tomcat container on port8080. -
The application server must not be accessible from outside the cluster. A ClusterIP Service has no external port and no route from outside the cluster network, so it satisfies this requirement by design. No Gateway, Ingress, or NodePort is needed.

The diagram shows the resulting architecture: external clients have no path into the application, while internal services reach the application server through the ClusterIP Service, which forwards traffic into the Pod managed by the Deployment. Inside the Pod, the Tomcat container serves requests and writes access logs to a shared volume, which the access logging sidecar reads and streams to standard output.
4.3.2 Implementation
Unlike single-container Pods, multi-container Pods cannot be created with kubectl create deployment alone. We need a YAML manifest to define both containers and the shared volume within the same Pod.
We start by creating a file called tomcat-with-logger.yaml:
cat <<EOF > tomcat-with-logger.yaml
With the following content:
apiVersion: apps/v1
kind: Deployment
metadata:
  name: tomcat-with-logger
  labels:
    app: tomcat-with-logger
spec:
  replicas: 1
  selector:
    matchLabels:
      app: tomcat-with-logger
  template:
    metadata:
      labels:
        app: tomcat-with-logger
    spec:
      containers:
        - name: tomcat
          image: tomcat:11.0-jre21
          ports:
            - containerPort: 8080
          readinessProbe:
            tcpSocket:
              port: 8080
            initialDelaySeconds: 30
            periodSeconds: 5
          volumeMounts:
            - name: logs
              mountPath: /usr/local/tomcat/logs
        - name: access-logger
          image: busybox:1.37
          command:
            - sh
            - -c
            - |
              until ls /usr/local/tomcat/logs/localhost_access_log.*.txt 1>/dev/null 2>&1; do
                sleep 1
              done
              tail -f /usr/local/tomcat/logs/localhost_access_log.*.txt
          volumeMounts:
            - name: logs
              mountPath: /usr/local/tomcat/logs
      volumes:
        - name: logs
          emptyDir: {}
EOF
There are a few things to note in this manifest:
- Shared volume: An
emptyDirvolume calledlogsis mounted at/usr/local/tomcat/logsin both containers. This is how the sidecar reads the log files written by Tomcat. AnemptyDirvolume is created when the Pod is assigned to a node and exists as long as the Pod is running on that node, making it ideal for sharing temporary data between containers in the same Pod. - Sidecar container: The
access-loggercontainer waits for the access log file to appear, then runstail -fon it. Tomcat names its access log files with a date suffix (e.g.,localhost_access_log.2026-03-26.txt), so the sidecar uses a wildcard pattern to match the current file. This means it will continuously stream new log entries to its standard output, where they can be read withkubectl logs. - Port mapping: Tomcat listens on port
8080by default, unlike nginx or httpd which listen on port80. The Service will map external port80to the container’s port8080, so internal clients can reach it on the standard HTTP port. - Readiness probe: Tomcat is a JVM-based server and takes longer to start than nginx or httpd. Without a readiness probe, the Pod transitions to
Runningbefore Tomcat is actually accepting connections, causing connection failures. ThetcpSocketprobe with a 30-second initial delay prevents the Service from routing traffic until Tomcat is ready. - Single replica: One replica is enough since brief unavailability is acceptable.
To verify the file was created correctly, run:
cat tomcat-with-logger.yaml
Apply the manifest to create the Deployment:
kubectl apply -f tomcat-with-logger.yaml
Next, we expose the Deployment as a ClusterIP Service. The Service listens on port 80 and forwards traffic to the Tomcat container port 8080.
kubectl expose deployment tomcat-with-logger \
    --name=tomcat-logger-svc \
    --type=ClusterIP \
    --port=80 \
    --target-port=8080
4.3.2.1 Verify resource creation
To verify that the Pod is running and that both containers are ready, execute the following command:
kubectl get pods -l app=tomcat-with-logger --watch
The output should look similar to this. Notice that the READY column shows 2/2, confirming that both the Tomcat container and the access-logger container are running. Because Tomcat is a JVM-based server, it may take up to a minute before the Pod becomes fully ready. Wait until READY shows 2/2 before proceeding:
NAME                                  READY   STATUS    RESTARTS   AGE
tomcat-with-logger-4a9e1c7d3b-m6n2p   2/2     Running   0          2m
To verify that the Service is configured correctly, run:
kubectl get svc tomcat-logger-svc
The output should look similar to this:
NAME                TYPE        CLUSTER-IP      EXTERNAL-IP   PORT(S)   AGE
tomcat-logger-svc   ClusterIP   10.96.211.58    <none>        80/TCP    1m
4.3.2.2 Test the application server
To test the application server, create a temporary Pod and send a request through the Service:
kubectl run -it --rm --restart=Never busybox --image=busybox sh
Inside the busybox Pod, use wget to access the application server through the Service ClusterIP:
wget -qO- http://tomcat-logger-svc
The response should be HTTP 404 page by default as no web application is deployed.
4.3.2.3 Verify the sidecar logs
After sending the request above, exit the busybox Pod and verify that the sidecar captured the access log entry. First, get the Pod name:
POD_NAME=$(kubectl get pods \
    -l app=tomcat-with-logger \
    -o jsonpath='{.items[0].metadata.name}') \
&& echo $POD_NAME
Then, read the logs from the access-logger container using the -c flag to specify which container to read from:
kubectl logs $POD_NAME -c access-logger
The output should show the access log entry from the request we made through the busybox Pod:
10.244.0.15 - - [26/Mar/2026:10:30:00 +0000] "GET / HTTP/1.1" 404 762
This confirms that the sidecar pattern is working correctly: Tomcat writes access logs to the shared volume, and the sidecar reads and exposes them through its standard output.
4.4 Task 4: Design and deploy a web server with a log adapter sidecar
Your team needs an internal web server that serves static content inside the cluster. The analytics team needs the access logs delivered in CSV format so they can ingest them directly into their data pipeline, but the web server produces logs in Common Log Format (CLF). The log format must be converted without modifying the web server configuration or accessing its container directly.
The web server must run as an httpd (Apache) container. A second container running busybox must act as a log adapter sidecar that continuously reads the httpd access log in Common Log Format, transforms each entry into CSV (ip,timestamp,method,path,status), and prints the result to its own standard output.
The web server must be reachable from other services inside the cluster through a stable address, but it must not be accessible from outside the cluster.
4.4.1 Architectural design
The task requires two containers where the sidecar transforms log data from one format to another, brief downtime is acceptable, and the web server must be reachable only from inside the cluster. These constraints drive four design decisions:
-
A single Deployment with one replica is enough because the application needs two containers in the same Pod, the httpd web server and the busybox log adapter sidecar. The Deployment creates a ReplicaSet that manages the Pod. If the Pod crashes, the ReplicaSet recreates it automatically at the cost of a short period of unavailability, which the task explicitly allows.
-
The sidecar needs to read httpd’s access logs and transform them from Common Log Format to CSV without execing into the httpd container. A volume mounted at
/usr/local/apache2/logslocation in both containers solves this: httpd writes its access log in Common Log Format to the shared volume, and the sidecar continuously reads it withtail -f, pipes each line throughawkto extract the relevant fields, and outputs the result as CSV to its own standard output. This is the adapter pattern: the sidecar converts data from the format the main container produces into the format downstream consumers expect. The shared volume acts as the data bridge between them. -
Other services need a stable address to reach the web server. Pod IPs change every time a Pod is recreated, so we place a ClusterIP Service (
httpd-adapter-svc) in front of the Pod. The Service provides a fixed cluster-internal DNS name and forwards traffic to the httpd container on port80. -
The web server must not be accessible from outside the cluster. A ClusterIP Service has no external port and no route from outside the cluster network, so it satisfies this requirement by design. No Gateway, Ingress, or NodePort is needed.

The diagram shows the resulting architecture: external clients have no path into the application, while internal services reach the web server through the ClusterIP Service, which forwards traffic into the Pod managed by the Deployment. Inside the Pod, the httpd container serves requests and writes access logs in Common Log Format to a shared volume, which the log adapter sidecar reads, transforms to CSV, and streams to standard output.
4.4.2 Implementation
Unlike single-container Pods, multi-container Pods cannot be created with kubectl create deployment alone. We need a YAML manifest to define both containers and the shared volume within the same Pod.
We start by creating a file called httpd-with-adapter.yaml:
cat <<EOF > httpd-with-adapter.yaml
With the following content:
apiVersion: apps/v1
kind: Deployment
metadata:
  name: httpd-with-adapter
  labels:
    app: httpd-with-adapter
spec:
  replicas: 1
  selector:
    matchLabels:
      app: httpd-with-adapter
  template:
    metadata:
      labels:
        app: httpd-with-adapter
    spec:
      containers:
        - name: httpd
          image: httpd:2.4
          command:
            - sh
            - -c
            - |
              sed -i 's|CustomLog /proc/self/fd/1 common|CustomLog logs/access_log common|' \
                /usr/local/apache2/conf/httpd.conf
              httpd-foreground
          ports:
            - containerPort: 80
          volumeMounts:
            - name: logs
              mountPath: /usr/local/apache2/logs
        - name: log-adapter
          image: busybox:1.37
          command:
            - sh
            - -c
            - |
              until [ -f /usr/local/apache2/logs/access_log ]; do sleep 1; done
              tail -f /usr/local/apache2/logs/access_log | \
                awk 'BEGIN{OFS=","} {print $1,substr($4,2),substr($6,2),$7,$9; fflush()}'
          volumeMounts:
            - name: logs
              mountPath: /usr/local/apache2/logs
      volumes:
        - name: logs
          emptyDir: {}
EOF
There are a few things to note in this manifest:
- Shared volume: An
emptyDirvolume calledlogsis mounted at/usr/local/apache2/logsin both containers. This is how the sidecar reads the log files written by httpd. AnemptyDirvolume is created when the Pod is assigned to a node and exists as long as the Pod is running on that node, making it ideal for sharing temporary data between containers in the same Pod. - httpd command override: The official
httpd:2.4Docker image configuresCustomLog /proc/self/fd/1 common, which redirects access logs to stdout instead of writing them to a file. The sidecar reads from the shared volume, so it needs a file. The httpd container’s command usessedto rewrite that directive toCustomLog logs/access_log commonbefore startinghttpd-foreground, making httpd write access logs to the shared volume where the sidecar can read them. - Adapter sidecar: The
log-adaptercontainer first waits foraccess_logto exist — httpd only creates the file on the first request, and theemptyDirvolume starts empty, sotail -fwould fail immediately without this guard. Once the file appears, it runstail -fpiped into a single-lineawkcommand.BEGIN{OFS=","}sets the output field separator to a comma, so theprintstatement separates each field with a comma automatically.substr($4,2)strips the leading[from the timestamp field, andsubstr($6,2)strips the leading"from the HTTP method. Thefflush()call forcesawkto flush its output buffer on every line — without it,kubectl logswould show nothing until the buffer fills up. This is the adapter pattern: the sidecar transforms data from the format the main container produces (CLF) into the format downstream consumers need (CSV). - Single replica: One replica is enough since brief unavailability is acceptable.
To verify the file was created correctly, run:
cat httpd-with-adapter.yaml
Apply the manifest to create the Deployment:
kubectl apply -f httpd-with-adapter.yaml
Next, we expose the Deployment as a ClusterIP Service. The Service listens on port 80 and forwards traffic to the httpd container port 80.
kubectl expose deployment httpd-with-adapter \
    --name=httpd-adapter-svc \
    --type=ClusterIP \
    --port=80 \
    --target-port=80
4.4.2.1 Verify resource creation
To verify that the Pod is running and that both containers are ready, execute the following command:
kubectl get pods -l app=httpd-with-adapter --watch
The output should look similar to this. Notice that the READY column shows 2/2, confirming that both the httpd container and the log-adapter container are running:
NAME                                  READY   STATUS    RESTARTS   AGE
httpd-with-adapter-7c8d3e5f2a-r9k1w   2/2     Running   0          2m
To verify that the Service is configured correctly, run:
kubectl get svc httpd-adapter-svc
The output should look similar to this:
NAME                TYPE        CLUSTER-IP      EXTERNAL-IP   PORT(S)   AGE
httpd-adapter-svc   ClusterIP   10.96.192.71    <none>        80/TCP    1m
4.4.2.2 Test the web server
To test the web server, create a temporary Pod and send a request through the Service:
kubectl run -it --rm --restart=Never busybox --image=busybox sh
Inside the busybox Pod, use wget to access the web server through the Service ClusterIP:
wget -qO- http://httpd-adapter-svc
The response should be the default Apache welcome page:
<html>
    <body>
        <h1>It works!</h1>
    </body>
</html>
4.4.2.3 Verify the adapter output
After sending the request above, exit the busybox Pod and verify that the adapter sidecar transformed the log entry. First, get the Pod name:
POD_NAME=$(kubectl get pods \
    -l app=httpd-with-adapter \
    -o jsonpath='{.items[0].metadata.name}') \
&& echo $POD_NAME
Then, read the logs from the log-adapter container using the -c flag to specify which container to read from:
kubectl logs $POD_NAME -c log-adapter
The output should show the access log entry transformed from httpd’s native Common Log Format into CSV. Instead of the raw CLF:
10.244.0.12 - - [26/Mar/2026:10:30:00 +0000] "GET / HTTP/1.1" 200 45
The adapter sidecar outputs:
10.244.0.12,26/Mar/2026:10:30:00,GET,/,200
This confirms that the adapter pattern is working correctly: httpd writes access logs in Common Log Format to the shared volume, and the adapter sidecar reads them, extracts the relevant fields, and outputs them as CSV to its standard output for downstream consumers.
4.5 Task 5: Design and deploy a web server with a content sync sidecar
Your team needs an internal status page that displays up-to-date system information inside the cluster. The content must refresh automatically every 30 seconds without restarting the web server. The operations team wants the page to show the current timestamp and hostname so they can verify the content is being updated.
The web server must run as an nginx container that serves whatever HTML files are present in its document root. A second container running busybox must act as a content sync sidecar that regenerates an HTML status page every 30 seconds and writes it to a shared volume where nginx can serve it.
The web server must be reachable from other services inside the cluster through a stable address, but it must not be accessible from outside the cluster.
4.5.1 Architectural design
The task requires two containers that share content data, brief downtime is acceptable, and the web server must be reachable only from inside the cluster. These constraints drive four design decisions:
-
A single Deployment with one replica is enough because the application needs two containers in the same Pod, the nginx web server and the busybox content sync sidecar. The Deployment creates a ReplicaSet that manages the Pod. If the Pod crashes, the ReplicaSet recreates it automatically at the cost of a short period of unavailability, which the task explicitly allows.
-
The sidecar needs to provide fresh content to nginx without modifying the nginx container or its configuration. A volume mounted at
/usr/share/nginx/htmlin both containers solves this: the sidecar writes anindex.htmlfile to the shared volume every 30 seconds, and nginx serves it to incoming requests. This reverses the typical sidecar data flow: instead of the sidecar reading from the main container, the sidecar writes content that the main container serves. The shared volume acts as the data bridge between them. -
Other services need a stable address to reach the web server. Pod IPs change every time a Pod is recreated, so we place a ClusterIP Service (
nginx-content-svc) in front of the Pod. The Service provides a fixed cluster-internal DNS name and forwards traffic to the nginx container on port80. -
The web server must not be accessible from outside the cluster. A ClusterIP Service has no external port and no route from outside the cluster network, so it satisfies this requirement by design. No Gateway, Ingress, or NodePort is needed.
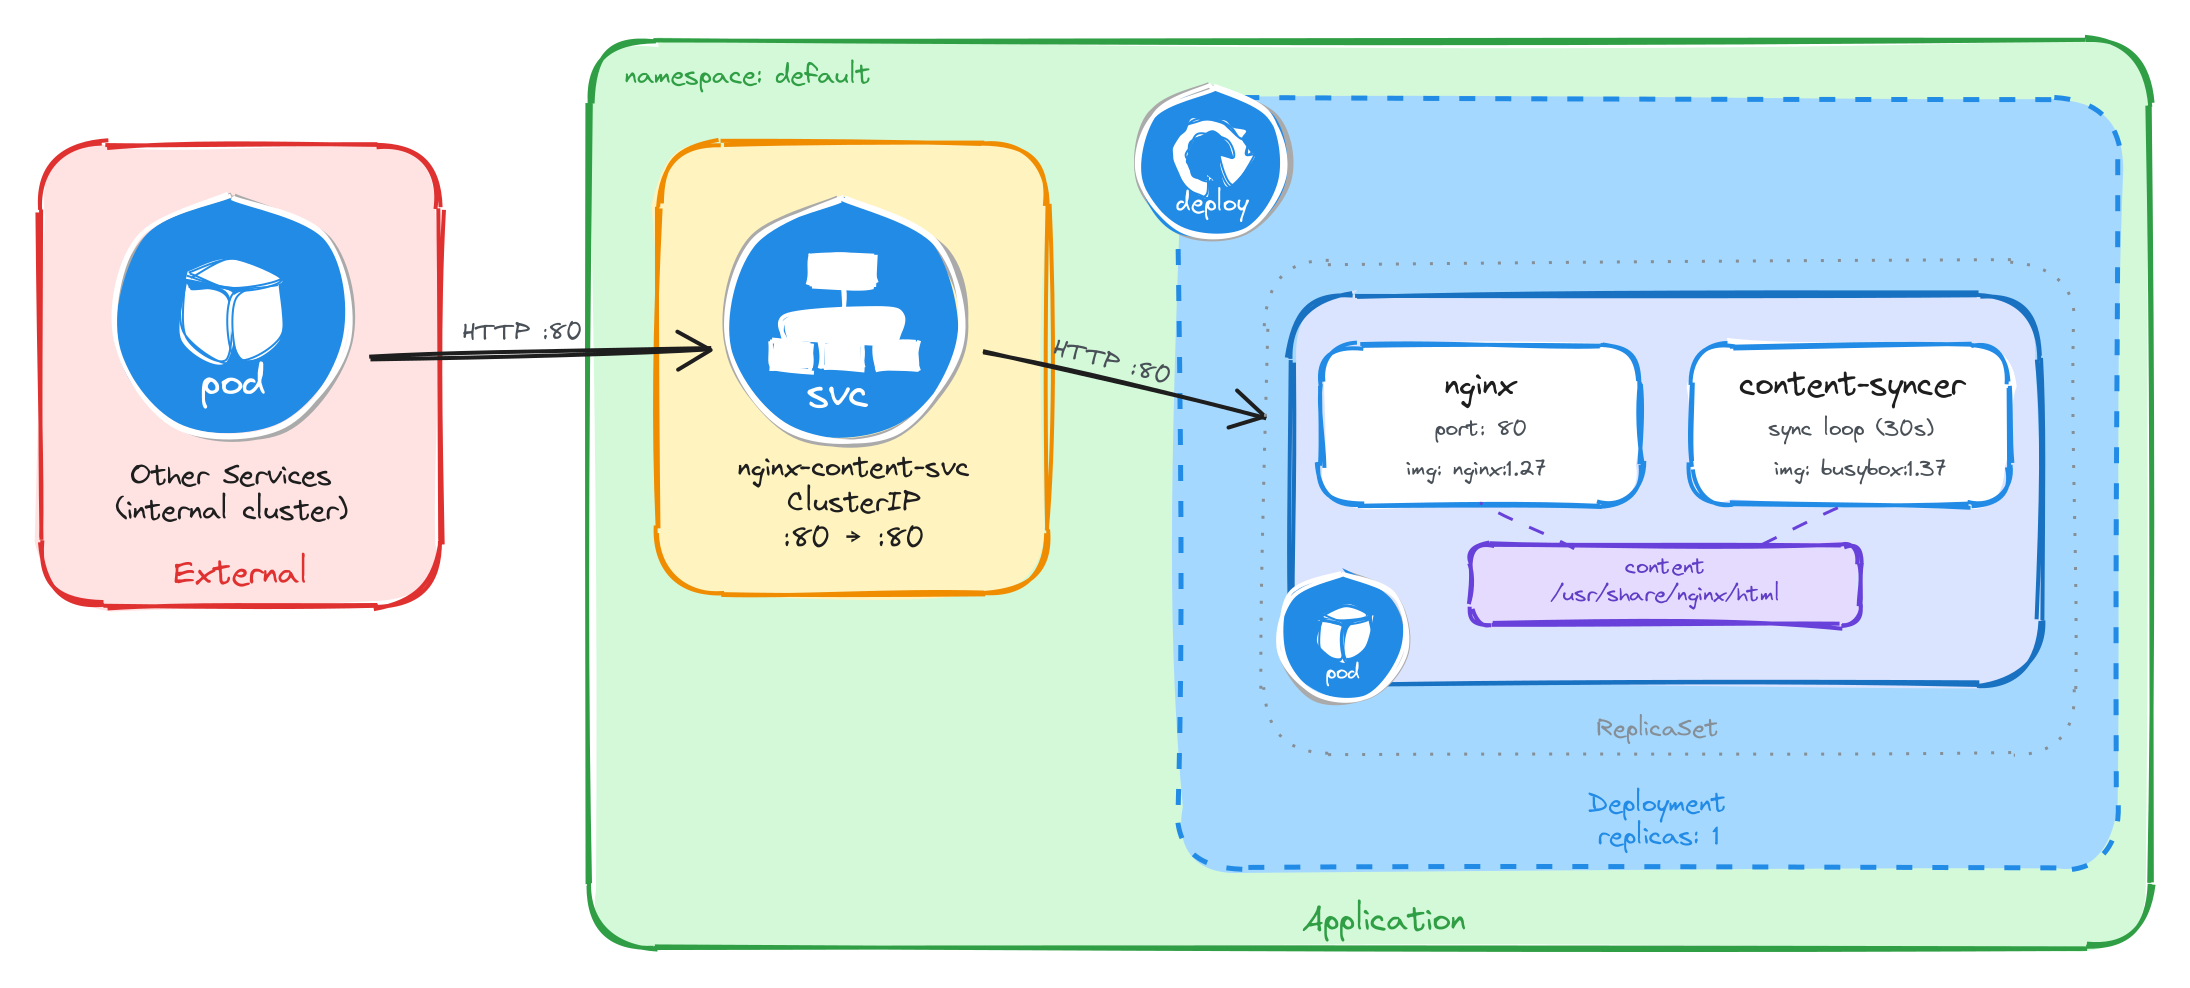
The diagram shows the resulting architecture: external clients have no path into the application, while internal services reach the web server through the ClusterIP Service, which forwards traffic into the Pod managed by the Deployment. Inside the Pod, the content sync sidecar regenerates the HTML status page every 30 seconds and writes it to a shared volume, which nginx reads and serves to clients.
4.5.2 Implementation
Unlike single-container Pods, multi-container Pods cannot be created with kubectl create deployment alone. We need a YAML manifest to define both containers and the shared volume within the same Pod.
We start by creating a file called nginx-with-syncer.yaml:
cat <<'EOF' > nginx-with-syncer.yaml
With the following content:
apiVersion: apps/v1
kind: Deployment
metadata:
  name: nginx-with-syncer
  labels:
    app: nginx-with-syncer
spec:
  replicas: 1
  selector:
    matchLabels:
      app: nginx-with-syncer
  template:
    metadata:
      labels:
        app: nginx-with-syncer
    spec:
      containers:
        - name: nginx
          image: nginx:1.27
          ports:
            - containerPort: 80
          volumeMounts:
            - name: content
              mountPath: /usr/share/nginx/html
        - name: content-syncer
          image: busybox:1.37
          command:
            - sh
            - -c
            - |
              while true; do
                echo "<html><head><title>Status Page</title></head><body><h1>System Status</h1><p>Hostname: $(hostname)</p><p>Last updated: $(date -u)</p></body></html>" > /usr/share/nginx/html/index.html
                sleep 30
              done
          volumeMounts:
            - name: content
              mountPath: /usr/share/nginx/html
      volumes:
        - name: content
          emptyDir: {}
EOF
There are a few things to note in this manifest:
- Shared volume: An
emptyDirvolume calledcontentis mounted at/usr/share/nginx/htmlin both containers. This is how nginx serves the files written by the sidecar. AnemptyDirvolume is created when the Pod is assigned to a node and exists as long as the Pod is running on that node, making it ideal for sharing temporary data between containers in the same Pod. - Reversed data flow: Unlike the previous tasks where the sidecar reads data produced by the main container, here the sidecar writes content that the main container serves. This demonstrates that the sidecar pattern is flexible: the shared volume can carry data in either direction.
- Sidecar container: The
content-syncercontainer runs an infinite loop that regeneratesindex.htmlevery 30 seconds usingechowith$(hostname)and$(date -u)command substitutions. The shell evaluates these at runtime, producing the Pod’s actual hostname and the current UTC timestamp. This means every request to nginx will return a page that was updated at most 30 seconds ago. - Single replica: One replica is enough since brief unavailability is acceptable.
To verify the file was created correctly, run:
cat nginx-with-syncer.yaml
Apply the manifest to create the Deployment:
kubectl apply -f nginx-with-syncer.yaml
Next, we expose the Deployment as a ClusterIP Service. The Service listens on port 80 and forwards traffic to the nginx container port 80.
kubectl expose deployment nginx-with-syncer \
    --name=nginx-content-svc \
    --type=ClusterIP \
    --port=80 \
    --target-port=80
4.5.2.1 Verify resource creation
To verify that the Pod is running and that both containers are ready, execute the following command:
kubectl get pods -l app=nginx-with-syncer --watch
The output should look similar to this. Notice that the READY column shows 2/2, confirming that both the nginx container and the content-syncer container are running:
NAME                                 READY   STATUS    RESTARTS   AGE
nginx-with-syncer-3f8a2b6d4c-j7w5t   2/2     Running   0          2m
To verify that the Service is configured correctly, run:
kubectl get svc nginx-content-svc
The output should look similar to this:
NAME                TYPE        CLUSTER-IP      EXTERNAL-IP   PORT(S)   AGE
nginx-content-svc   ClusterIP   10.96.156.33    <none>        80/TCP    1m
4.5.2.2 Test the web server
To test the web server, create a temporary Pod and send a request through the Service:
kubectl run -it --rm --restart=Never busybox --image=busybox sh
Inside the busybox Pod, use wget to access the web server through the Service ClusterIP:
wget -qO- http://nginx-content-svc
The response should be the dynamically generated status page:
<html>
    <head><title>Status Page</title></head>
    <body>
        <h1>System Status</h1>
        <p>Hostname: nginx-with-syncer-3f8a2b6d4c-j7w5t</p>
        <p>Last updated: Wed Mar 26 10:30:00 UTC 2026</p>
    </body>
</html>
4.5.2.3 Verify the content refreshes
To confirm that the sidecar is regenerating the page, wait at least 30 seconds and send a second request from inside the busybox Pod:
sleep 35 && wget -qO- http://nginx-content-svc
The Last updated timestamp should be different from the first request, confirming that the content sync sidecar is continuously regenerating the page.
This confirms that the sidecar pattern is working correctly: the content-syncer writes fresh HTML to the shared volume every 30 seconds, and nginx serves it to clients.