5 Namespace-isolated deployment
Design and deploy the same application with its internal Service into separate Namespaces to simulate staging and production environments.
This category includes the following learning objectives:
- Understanding of Pods.
- Understanding of Deployments.
- Understanding of ClusterIP Services.
- Understanding of Namespace isolation, resource scoping, and deploying objects into specific Namespaces.
5.1 Task 1: Design and deploy a web application in staging and production namespaces
Your team needs to run the same internal web application in two isolated environments: staging and production. Each environment must be fully self-contained, with its own Deployment and Service, so that changes in one environment cannot affect the other.
The web application must run as a hello-kubernetes container, which displays the namespace it is running in, making it easy to confirm namespace isolation visually. It does not need to be highly resilient, since brief periods of unavailability are acceptable.
Other services within each namespace need a stable address to reach the web application, but it must not be accessible from outside the cluster.
5.1.1 Architectural design
The task requires running the same application in two isolated environments, brief downtime is acceptable, and the application must be reachable only from inside each namespace. These constraints drive four design decisions:
-
Two separate Namespaces (
stagingandproduction) provide the isolation boundary. Every Kubernetes resource is scoped to a Namespace, so Deployments, Pods, and Services created in one Namespace are invisible to the other. This lets both environments share the same resource names without conflict. -
Because the application is a single container and brief downtime is acceptable, a Deployment with one replica per Namespace is enough. Each Deployment creates its own ReplicaSet, which recreates the Pod automatically if it crashes, at the cost of a short period of unavailability that the task explicitly allows.
-
Other services within each Namespace need a stable address to reach the web application. Pod IPs change every time a Pod is recreated, so we place a ClusterIP Service (
web-app-svc) in front of the Pod in each Namespace. The Service provides a fixed cluster-internal DNS name and forwards traffic to the Pod. It accepts requests on port80and forwards them to the container’s port8080. -
The application must not be accessible from outside the cluster. A ClusterIP Service has no external port and no route from outside the cluster network, so it satisfies this requirement by design. No Gateway, Ingress, or NodePort is needed.
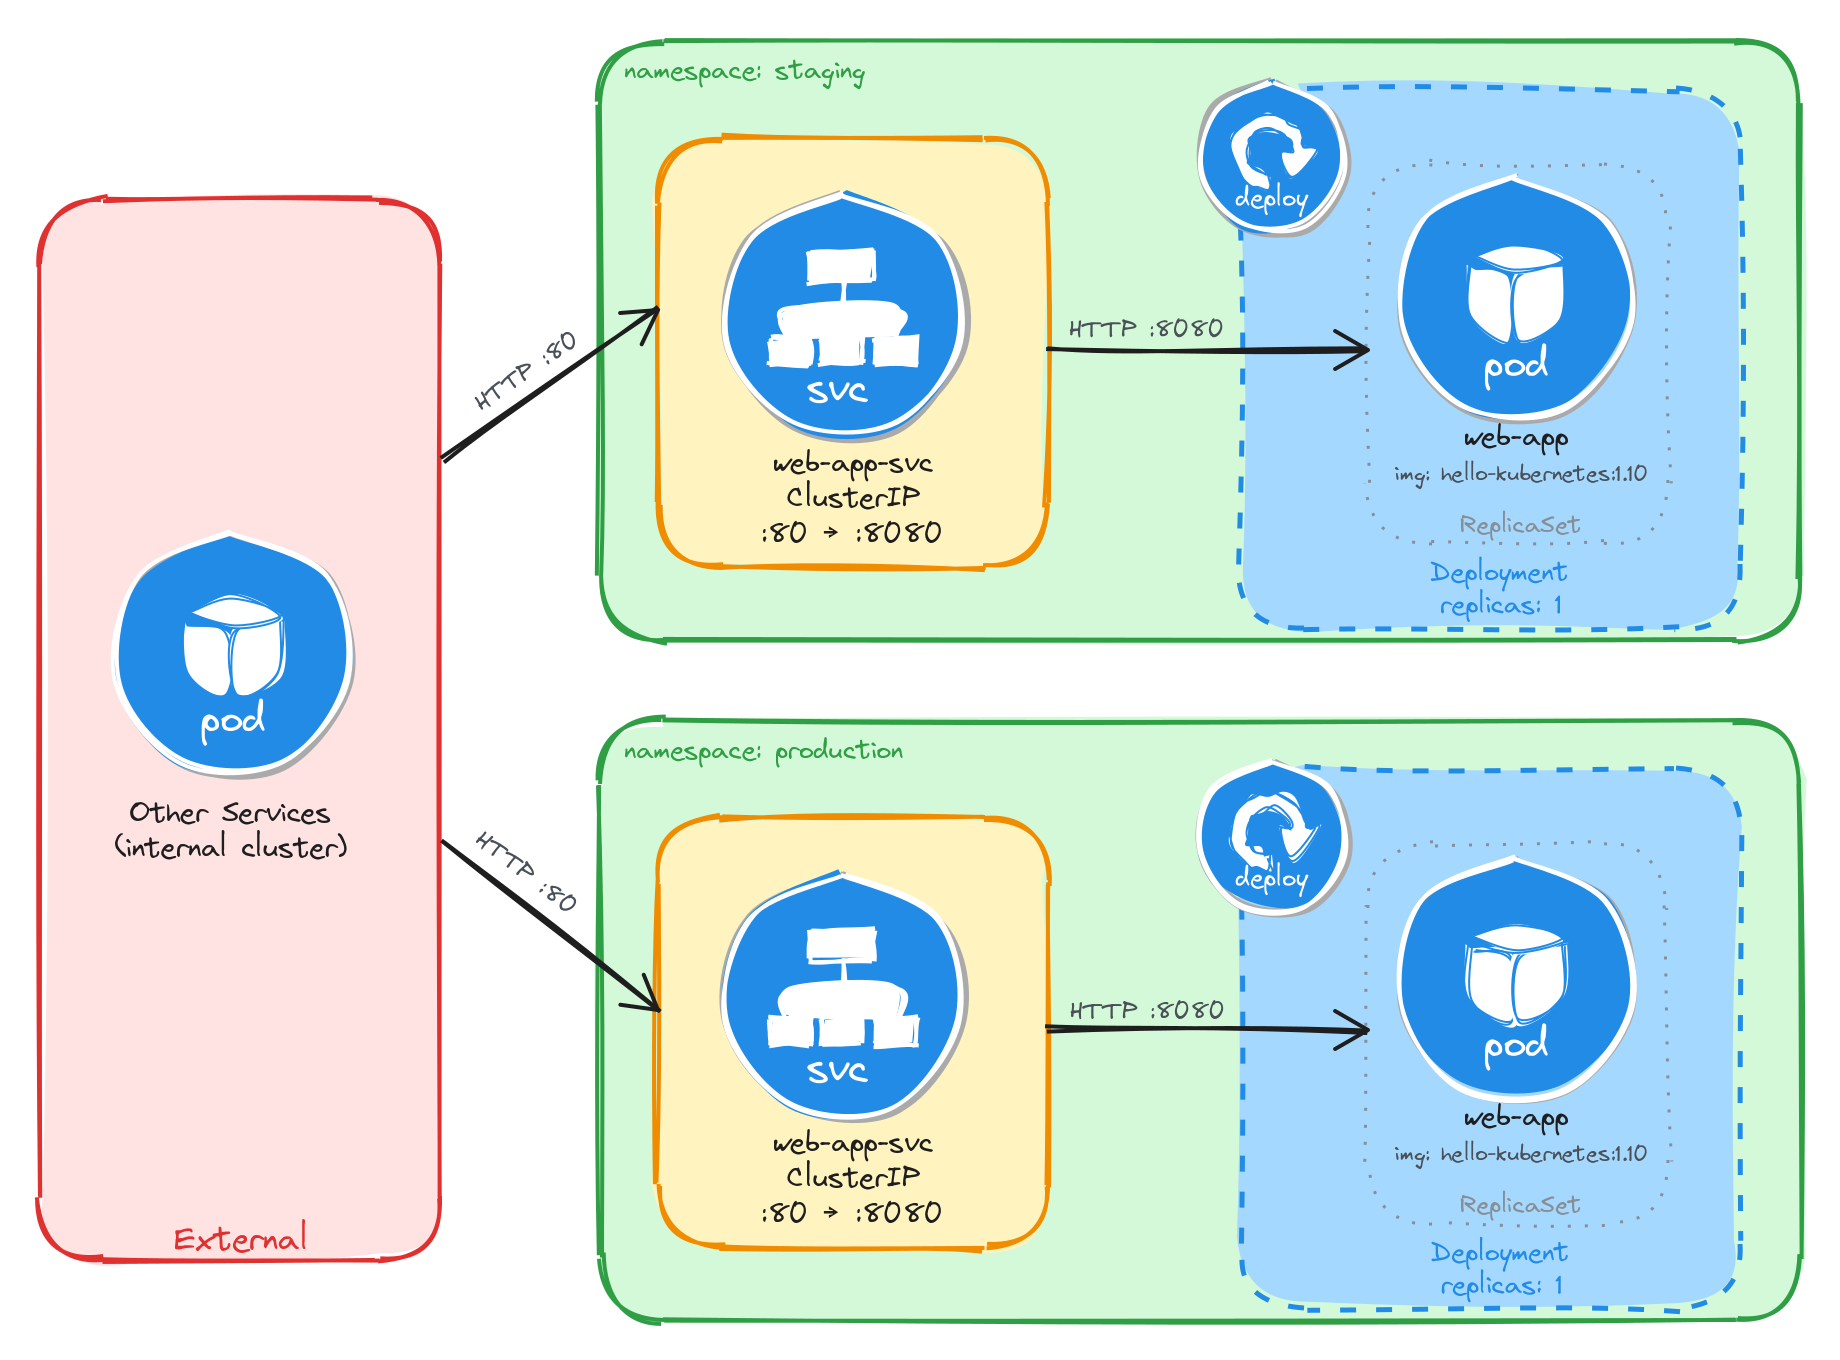
The diagram shows the resulting architecture: the staging and production Namespaces each contain an independent Deployment and ClusterIP Service with the same names. External clients have no path into either environment, while internal services reach the web application through the ClusterIP Service in their own Namespace. Cross-namespace access is possible only via the fully qualified DNS name (web-app-svc.<namespace>.svc.cluster.local), since short Service names resolve only within the same Namespace.
5.1.2 Implementation
We start by creating the two namespaces:
kubectl create namespace staging
kubectl create namespace production
Next, we create a file called web-app.yaml that will be reused for both environments:
cat <<EOF > web-app.yaml
With the following content:
apiVersion: apps/v1
kind: Deployment
metadata:
  name: web-app
  labels:
    app: web-app
spec:
  replicas: 1
  selector:
    matchLabels:
      app: web-app
  template:
    metadata:
      labels:
        app: web-app
    spec:
      containers:
        - name: hello-kubernetes
          image: paulbouwer/hello-kubernetes:1.10
          ports:
            - containerPort: 8080
          env:
            - name: KUBERNETES_NAMESPACE
              valueFrom:
                fieldRef:
                  fieldPath: metadata.namespace
EOF
The KUBERNETES_NAMESPACE environment variable is injected using the downward API, which allows a container to read its own Pod metadata at runtime. The hello-kubernetes application uses this variable to display the namespace in its response.
Notice that the manifest does not include a namespace field in the metadata. We will supply the target namespace at apply time using the -n flag, which lets us reuse the same manifest for both environments.
To verify the file was created correctly, run:
cat web-app.yaml
Apply the manifest to both namespaces:
kubectl apply -f web-app.yaml -n staging
kubectl apply -f web-app.yaml -n production
Next, we expose each Deployment as a ClusterIP Service inside its respective namespace:
kubectl expose deployment web-app \
    -n staging \
    --name=web-app-svc \
    --type=ClusterIP \
    --port=80 \
    --target-port=8080
kubectl expose deployment web-app \
    -n production \
    --name=web-app-svc \
    --type=ClusterIP \
    --port=80 \
    --target-port=8080
5.1.2.1 Verify resource creation
To verify that the Pods are running in each namespace, execute the following commands:
kubectl get pods -n staging -l app=web-app
kubectl get pods -n production -l app=web-app
The output for each should look similar to this:
NAME                          READY   STATUS    RESTARTS   AGE
web-app-6bfbf8b67c-m4t9x      1/1     Running   0          1m
To verify that the Services are configured correctly in each namespace, run:
kubectl get svc -n staging web-app-svc
kubectl get svc -n production web-app-svc
The output for each should look similar to this:
NAME             TYPE        CLUSTER-IP      EXTERNAL-IP   PORT(S)   AGE
web-app-svc      ClusterIP   10.96.112.54    <none>        80/TCP    1m
Note that the two Services share the same name (web-app-svc) but have different Cluster IPs, because they are independent resources in separate namespaces.
5.1.2.2 Test the web application
To test the staging web application, create a temporary Pod inside the staging namespace and send a request through the Service:
kubectl run -n staging -it --rm --restart=Never busybox --image=busybox -- sh
Inside the busybox Pod, use wget to access the web application through the Service:
wget -qO- http://web-app-svc
The response should be the hello-kubernetes HTML page showing the namespace the Pod is running in:
<!DOCTYPE html>
<html>
<head>
    <title>Hello Kubernetes!</title>
    <!-- CSS styles omitted for brevity -->
</head>
<body>
  <div class="main">
    <!-- Content omitted for brevity -->
    <div class="content">
      <div id="message">Hello world!</div>
      <div id="info">
        <table>
          <tr>
            <th>namespace:</th>
            <td>staging</td>
          </tr>
          <tr>
            <th>pod:</th>
            <td>web-app-67d9bd9d5d-n5t7g</td>
          </tr>
          <tr>
            <th>node:</th>
            <td>- (Linux 6.8.0-101-generic)</td>
          </tr>
        </table>
      </div>
    </div>
  </div>
</body>
</html>
To confirm that the response contains the correct namespace, run:
wget -qO- http://web-app-svc | grep -A1 'namespace'
The output should show the staging namespace:
<th>namespace:</th>
<td>staging</td>
Repeat the same test for the production namespace by running the busybox Pod with -n production. The grep output should show production instead of staging, confirming that each Deployment is running in its own isolated namespace.
5.1.2.3 Verify namespace isolation
To confirm that the short Service name does not resolve across namespaces, create a temporary Pod in the default namespace:
kubectl run -it --rm --restart=Never busybox --image=busybox -- sh
Inside this Pod, attempt to reach the staging web application using its short service name:
wget -qO- --timeout=5 http://web-app-svc
This fails because short Service names only resolve within the same namespace. Services in other namespaces are reachable using their fully qualified DNS name (<service>.<namespace>.svc.cluster.local):
wget -qO- http://web-app-svc.staging.svc.cluster.local
This request succeeds, demonstrating that Kubernetes namespaces scope resource visibility and RBAC, but do not enforce network-level isolation on their own. To restrict cross-namespace traffic, NetworkPolicies must be used in addition to namespaces.
The same can be done to access the production web application:
wget -qO- http://web-app-svc.production.svc.cluster.local
5.2 Task 2: Design and deploy an internal API status endpoint in dev and QA namespaces
Your team needs to run the same internal API status endpoint in two isolated environments: dev and qa. Each environment must be fully self-contained, with its own Deployment and Service, so that developers and testers can work independently without interfering with each other.
The API status endpoint must run as a podinfo container, which returns JSON metadata including a configurable message that displays the namespace it is running in, making it easy to confirm namespace isolation programmatically. It does not need to be highly resilient, since brief periods of unavailability are acceptable.
Other services within each namespace need a stable address to reach the API status endpoint, but it must not be accessible from outside the cluster.
5.2.1 Architectural design
The task requires running the same application in two isolated environments, brief downtime is acceptable, and the application must be reachable only from inside each namespace. These constraints drive four design decisions:
-
Two separate Namespaces (
devandqa) provide the isolation boundary. Every Kubernetes resource is scoped to a Namespace, so Deployments, Pods, and Services created in one Namespace are invisible to the other. This lets both environments share the same resource names without conflict. -
Because the application is a single container and brief downtime is acceptable, a Deployment with one replica per Namespace is enough. Each Deployment creates its own ReplicaSet, which recreates the Pod automatically if it crashes, at the cost of a short period of unavailability that the task explicitly allows.
-
Other services within each Namespace need a stable address to reach the API status endpoint. Pod IPs change every time a Pod is recreated, so we place a ClusterIP Service (
api-status-svc) in front of the Pod in each Namespace. The Service provides a fixed cluster-internal DNS name and forwards traffic to the Pod. It accepts requests on port80and forwards them to the container’s port9898. -
The application must not be accessible from outside the cluster. A ClusterIP Service has no external port and no route from outside the cluster network, so it satisfies this requirement by design. No Gateway, Ingress, or NodePort is needed.
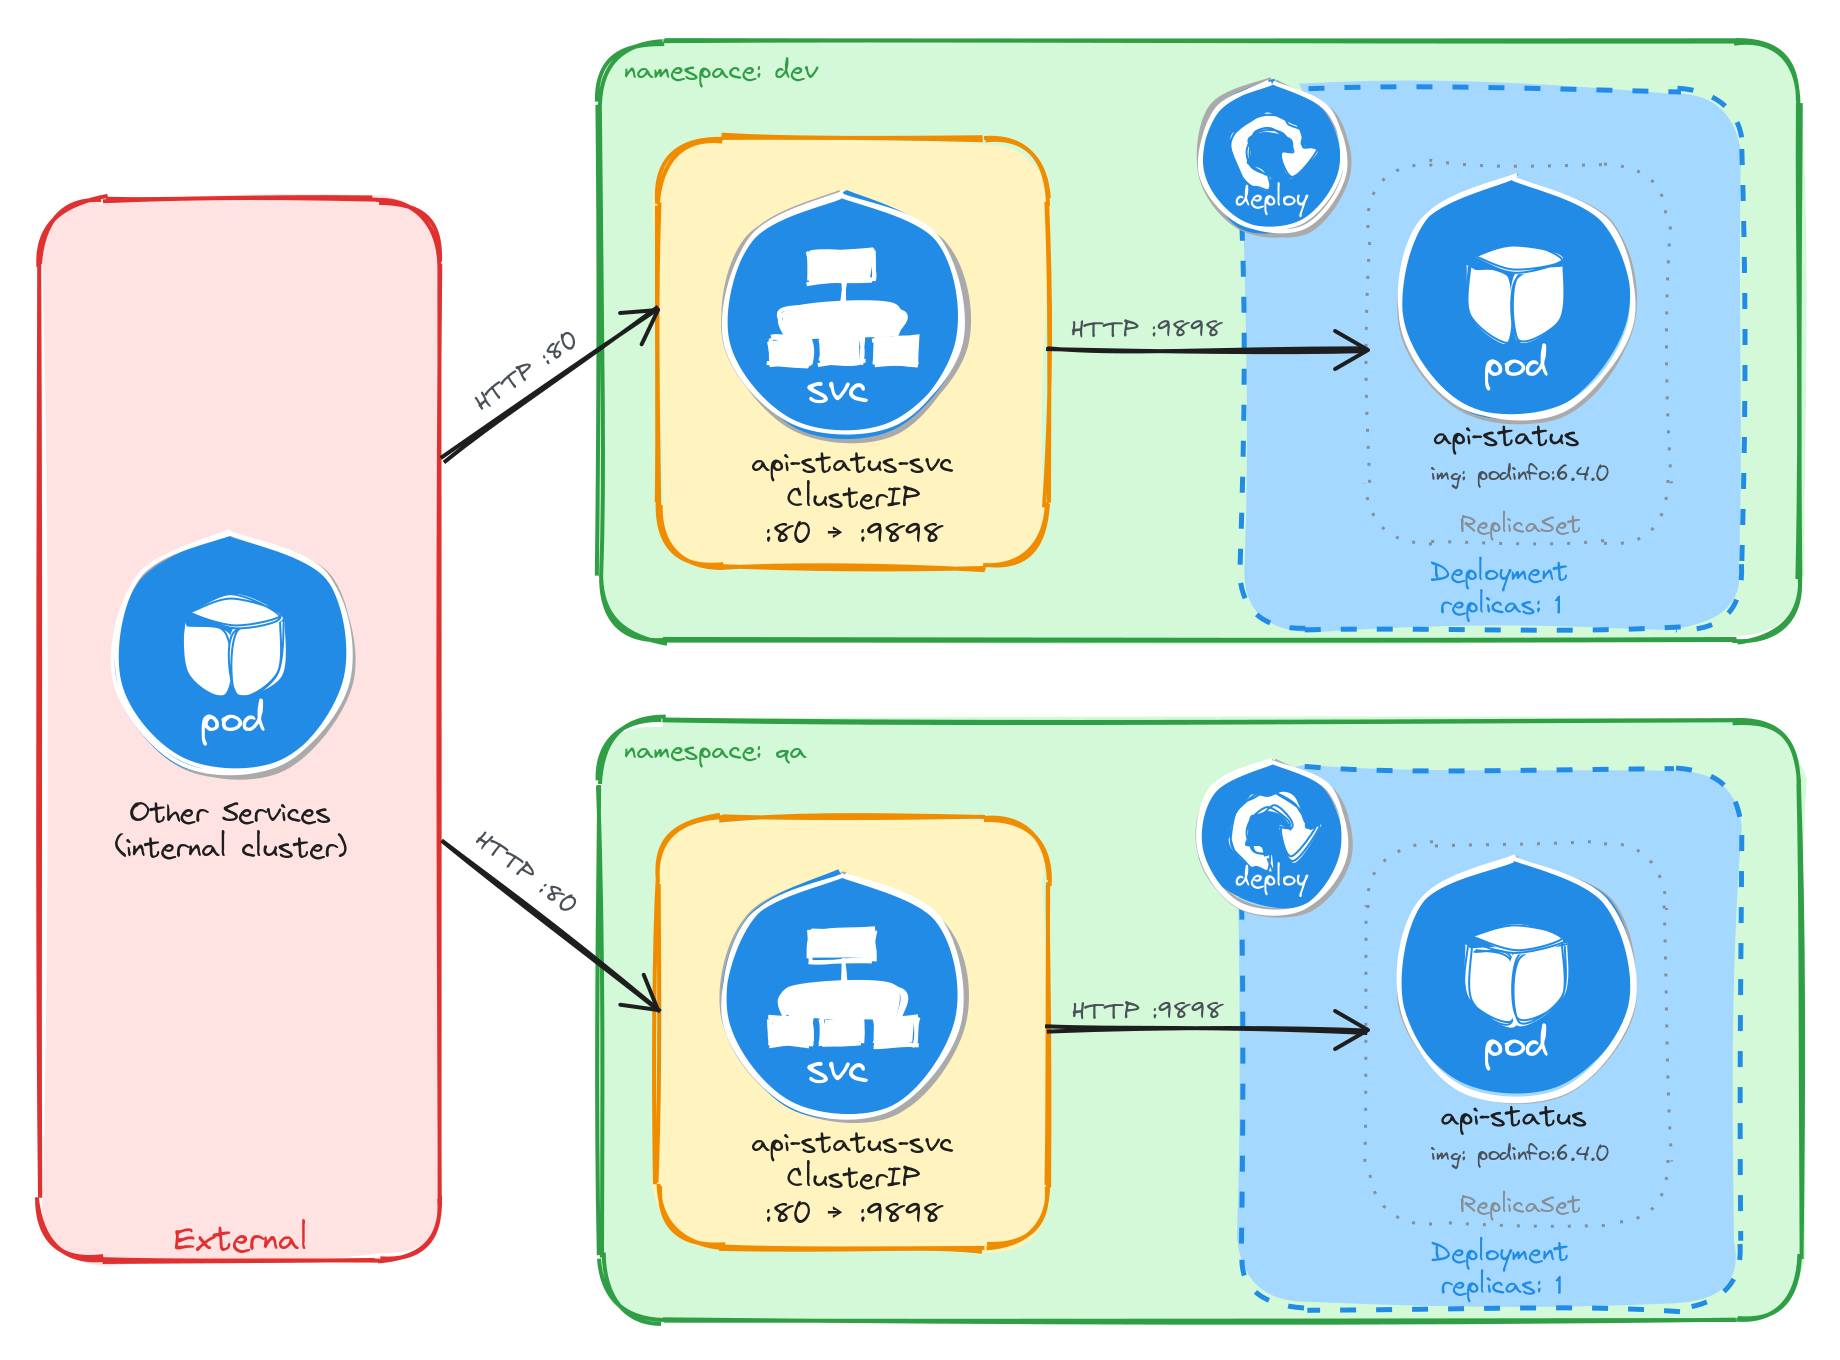
The diagram shows the resulting architecture: the dev and qa Namespaces each contain an independent Deployment and ClusterIP Service with the same names. External clients have no path into either environment, while internal services reach the API status endpoint through the ClusterIP Service in their own Namespace. Cross-namespace access is possible only via the fully qualified DNS name (api-status-svc.<namespace>.svc.cluster.local), since short Service names resolve only within the same Namespace.
5.2.2 Implementation
We start by creating the two namespaces:
kubectl create namespace dev
kubectl create namespace qa
Next, we create a file called api-status.yaml that will be reused for both environments:
cat <<EOF > api-status.yaml
With the following content:
apiVersion: apps/v1
kind: Deployment
metadata:
  name: api-status
  labels:
    app: api-status
spec:
  replicas: 1
  selector:
    matchLabels:
      app: api-status
  template:
    metadata:
      labels:
        app: api-status
    spec:
      containers:
        - name: podinfo
          image: stefanprodan/podinfo:6.4.0
          ports:
            - containerPort: 9898
          env:
            - name: PODINFO_UI_MESSAGE
              valueFrom:
                fieldRef:
                  fieldPath: metadata.namespace
EOF
The PODINFO_UI_MESSAGE environment variable is injected using the downward API, which allows a container to read its own Pod metadata at runtime. The podinfo application uses this variable to set the message field in its JSON response, making it easy to confirm which namespace the Pod is running in.
Notice that the manifest does not include a namespace field in the metadata. We will supply the target namespace at apply time using the -n flag, which lets us reuse the same manifest for both environments.
To verify the file was created correctly, run:
cat api-status.yaml
Apply the manifest to both namespaces:
kubectl apply -f api-status.yaml -n dev
kubectl apply -f api-status.yaml -n qa
Next, we expose each Deployment as a ClusterIP Service inside its respective namespace:
kubectl expose deployment api-status \
    -n dev \
    --name=api-status-svc \
    --type=ClusterIP \
    --port=80 \
    --target-port=9898
kubectl expose deployment api-status \
    -n qa \
    --name=api-status-svc \
    --type=ClusterIP \
    --port=80 \
    --target-port=9898
5.2.2.1 Verify resource creation
To verify that the Pods are running in each namespace, execute the following commands:
kubectl get pods -n dev -l app=api-status
kubectl get pods -n qa -l app=api-status
The output for each should look similar to this:
NAME                          READY   STATUS    RESTARTS   AGE
api-status-7d6c8b4f59-r3n8x   1/1     Running   0          1m
To verify that the Services are configured correctly in each namespace, run:
kubectl get svc -n dev api-status-svc
kubectl get svc -n qa api-status-svc
The output for each should look similar to this:
NAME              TYPE        CLUSTER-IP      EXTERNAL-IP   PORT(S)   AGE
api-status-svc    ClusterIP   10.96.185.42    <none>        80/TCP    1m
Note that the two Services share the same name (api-status-svc) but have different Cluster IPs, because they are independent resources in separate namespaces.
5.2.2.2 Test the API status endpoint
To test the dev API status endpoint, create a temporary Pod inside the dev namespace and send a request through the Service:
kubectl run -n dev -it --rm --restart=Never busybox --image=busybox -- sh
Inside the busybox Pod, use wget to access the API status endpoint through the Service:
wget -qO- http://api-status-svc
The response should be a JSON payload showing pod metadata, with the message field set to the namespace the Pod is running in:
{
  "hostname": "api-status-7d6c8b4f59-r3n8x",
  "version": "6.4.0",
  "revision": "",
  "color": "#34577c",
  "logo": "https://raw.githubusercontent.com/stefanprodan/podinfo/gh-pages/cuddle_clap.gif",
  "message": "dev",
  "goos": "linux",
  "goarch": "amd64",
  "runtime": "go1.21.0",
  "num_goroutine": "8",
  "num_cpu": "2"
}
To confirm that the response contains the correct namespace, run:
wget -qO- http://api-status-svc | grep '"message"'
The output should show the dev namespace:
"message": "dev",
Repeat the same test for the qa namespace by running the busybox Pod with -n qa. The message field should show qa instead of dev, confirming that each Deployment is running in its own isolated namespace.
5.2.2.3 Verify namespace isolation
To confirm that the short Service name does not resolve across namespaces, create a temporary Pod in the default namespace:
kubectl run -it --rm --restart=Never busybox --image=busybox -- sh
Inside this Pod, attempt to reach the dev API status endpoint using its short service name:
wget -qO- --timeout=5 http://api-status-svc
This fails because short Service names only resolve within the same namespace. Services in other namespaces are reachable using their fully qualified DNS name (<service>.<namespace>.svc.cluster.local):
wget -qO- http://api-status-svc.dev.svc.cluster.local
This request succeeds, demonstrating that Kubernetes namespaces scope resource visibility and RBAC, but do not enforce network-level isolation on their own. To restrict cross-namespace traffic, NetworkPolicies must be used in addition to namespaces.
The same can be done to access the QA API status endpoint:
wget -qO- http://api-status-svc.qa.svc.cluster.local
5.3 Task 3: Design and deploy an internal request debugging tool in team-isolated namespaces
Your organization has two independent development teams, team-alpha and team-beta, that share the same cluster. Each team needs its own instance of an internal request debugging tool so they can inspect HTTP headers and connection details without interfering with each other.
The debugging tool must run as a traefik/whoami container, which returns a plain-text summary of each incoming request including the server name, hostname, IP address, and headers. The server name will be set to the namespace through the downward API, making it easy to confirm namespace isolation from the response. It does not need to be highly resilient, since brief periods of unavailability are acceptable.
Other services within each namespace need a stable address to reach the debugging tool, but it must not be accessible from outside the cluster.
5.3.1 Architectural design
The task requires running the same application in two isolated environments, brief downtime is acceptable, and the application must be reachable only from inside each namespace. These constraints drive four design decisions:
-
Two separate Namespaces (
team-alphaandteam-beta) provide the isolation boundary. Every Kubernetes resource is scoped to a Namespace, so Deployments, Pods, and Services created in one Namespace are invisible to the other. This lets both environments share the same resource names without conflict. -
Because the application is a single container and brief downtime is acceptable, a Deployment with one replica per Namespace is enough. Each Deployment creates its own ReplicaSet, which recreates the Pod automatically if it crashes, at the cost of a short period of unavailability that the task explicitly allows.
-
Other services within each Namespace need a stable address to reach the debugging tool. Pod IPs change every time a Pod is recreated, so we place a ClusterIP Service (
request-debug-svc) in front of the Pod in each Namespace. The Service provides a fixed cluster-internal DNS name and forwards traffic to the Pod. It accepts requests on port80and forwards them to the container’s port80. -
The application must not be accessible from outside the cluster. A ClusterIP Service has no external port and no route from outside the cluster network, so it satisfies this requirement by design. No Gateway, Ingress, or NodePort is needed.
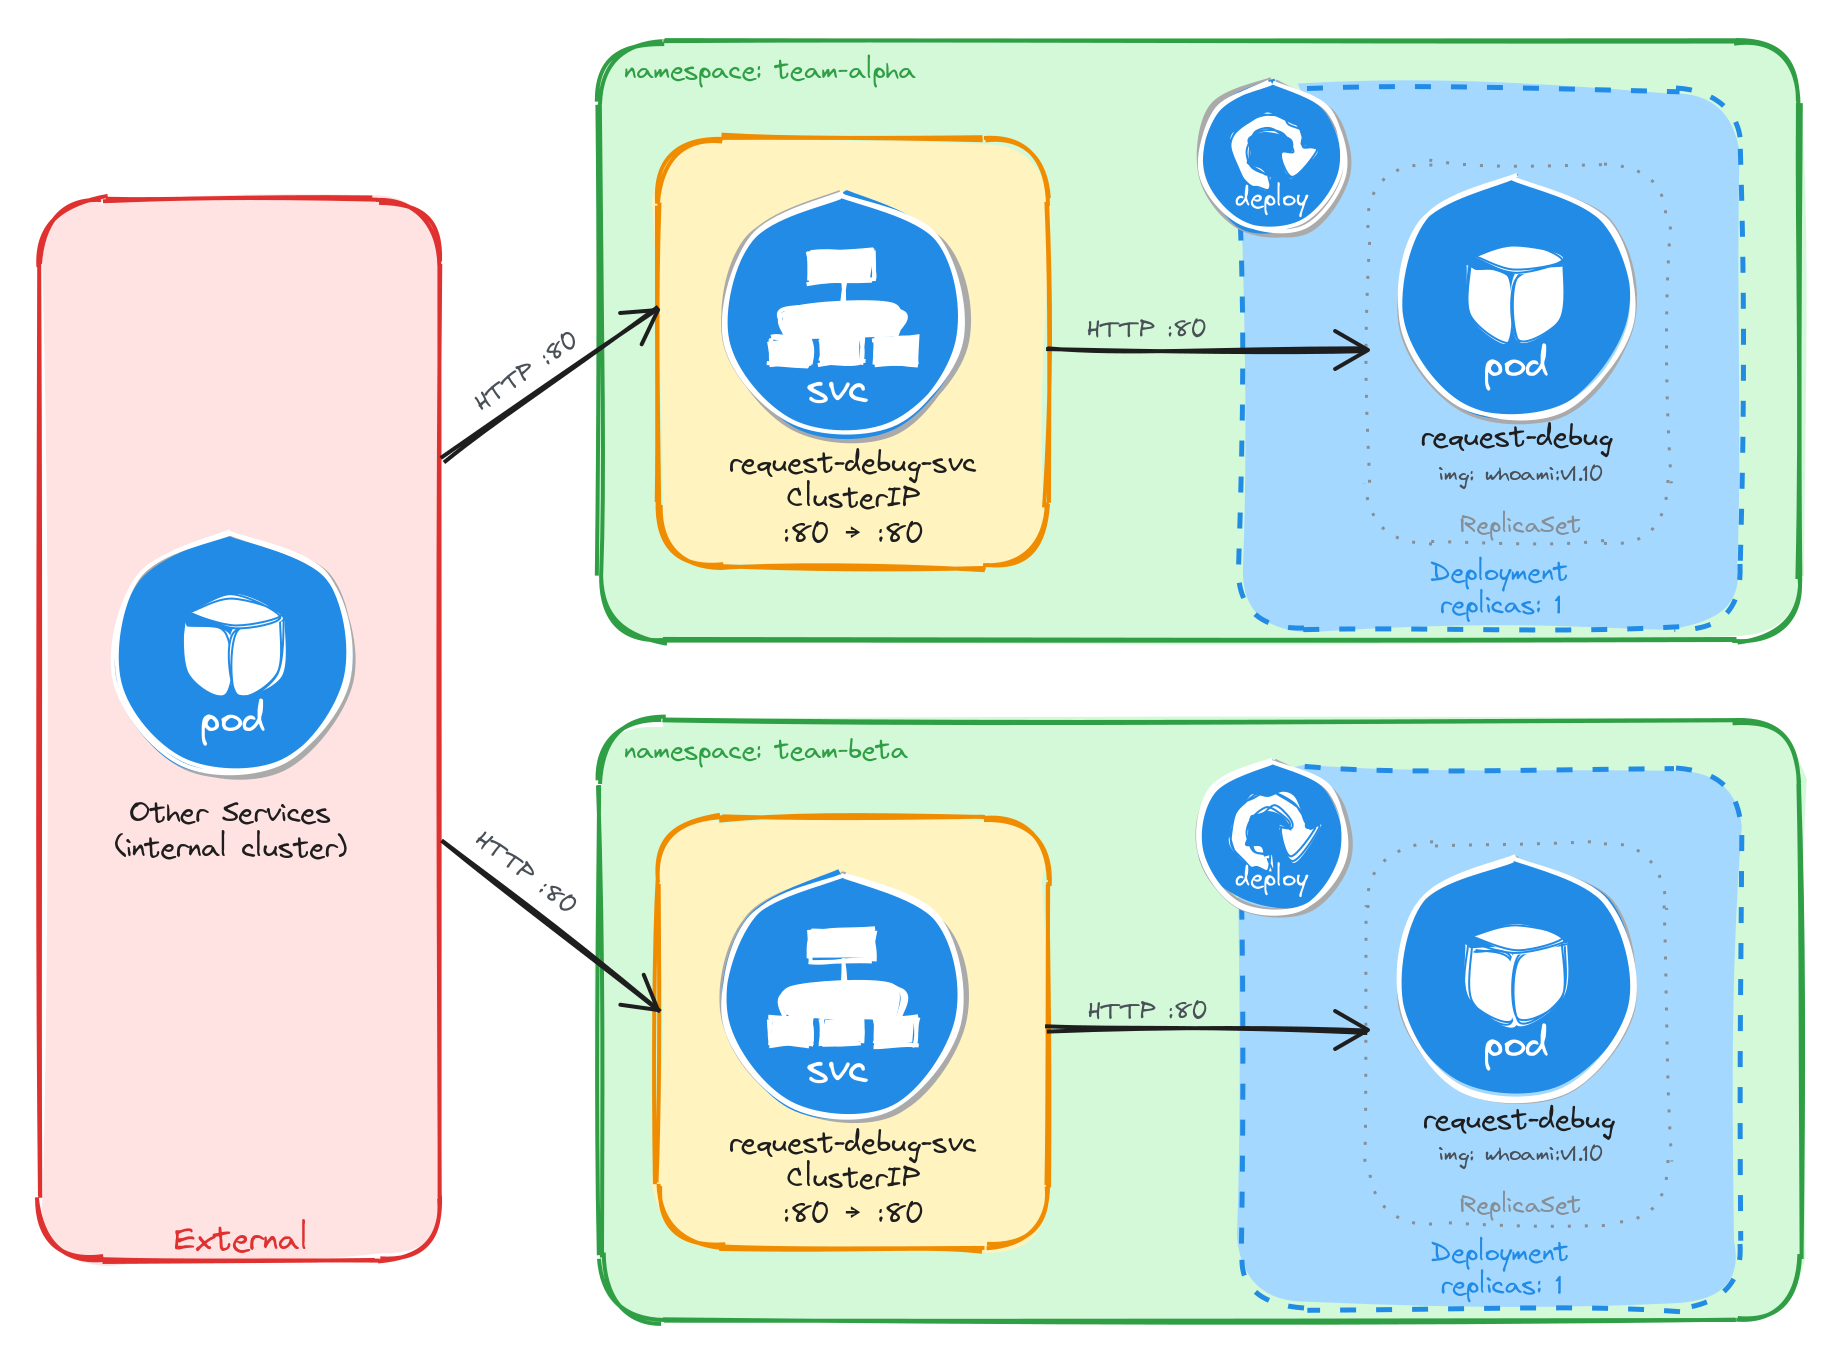
The diagram shows the resulting architecture: the team-alpha and team-beta Namespaces each contain an independent Deployment and ClusterIP Service with the same names. External clients have no path into either environment, while internal services reach the debugging tool through the ClusterIP Service in their own Namespace. Cross-namespace access is possible only via the fully qualified DNS name (request-debug-svc.<namespace>.svc.cluster.local), since short Service names resolve only within the same Namespace.
5.3.2 Implementation
We start by creating the two namespaces:
kubectl create namespace team-alpha
kubectl create namespace team-beta
Next, we create a file called request-debug.yaml that will be reused for both environments:
cat <<EOF > request-debug.yaml
With the following content:
apiVersion: apps/v1
kind: Deployment
metadata:
  name: request-debug
  labels:
    app: request-debug
spec:
  replicas: 1
  selector:
    matchLabels:
      app: request-debug
  template:
    metadata:
      labels:
        app: request-debug
    spec:
      containers:
        - name: whoami
          image: traefik/whoami:v1.10
          ports:
            - containerPort: 80
          env:
            - name: WHOAMI_NAME
              valueFrom:
                fieldRef:
                  fieldPath: metadata.namespace
EOF
The WHOAMI_NAME environment variable is injected using the downward API, which allows a container to read its own Pod metadata at runtime. The whoami application uses this variable to override the Name field in its plain-text response, making it easy to confirm which namespace the Pod is running in.
Notice that the manifest does not include a namespace field in the metadata. We will supply the target namespace at apply time using the -n flag, which lets us reuse the same manifest for both environments.
To verify the file was created correctly, run:
cat request-debug.yaml
Apply the manifest to both namespaces:
kubectl apply -f request-debug.yaml -n team-alpha
kubectl apply -f request-debug.yaml -n team-beta
Next, we expose each Deployment as a ClusterIP Service inside its respective namespace:
kubectl expose deployment request-debug \
    -n team-alpha \
    --name=request-debug-svc \
    --type=ClusterIP \
    --port=80 \
    --target-port=80
kubectl expose deployment request-debug \
    -n team-beta \
    --name=request-debug-svc \
    --type=ClusterIP \
    --port=80 \
    --target-port=80
5.3.2.1 Verify resource creation
To verify that the Pods are running in each namespace, execute the following commands:
kubectl get pods -n team-alpha -l app=request-debug
kubectl get pods -n team-beta -l app=request-debug
The output for each should look similar to this:
NAME                             READY   STATUS    RESTARTS   AGE
request-debug-5c8f9a7b64-k2v4p   1/1     Running   0          1m
To verify that the Services are configured correctly in each namespace, run:
kubectl get svc -n team-alpha request-debug-svc
kubectl get svc -n team-beta request-debug-svc
The output for each should look similar to this:
NAME                TYPE        CLUSTER-IP      EXTERNAL-IP   PORT(S)   AGE
request-debug-svc   ClusterIP   10.96.203.17    <none>        80/TCP    1m
Note that the two Services share the same name (request-debug-svc) but have different Cluster IPs, because they are independent resources in separate namespaces.
5.3.2.2 Test the request debugging tool
To test the team-alpha debugging tool, create a temporary Pod inside the team-alpha namespace and send a request through the Service:
kubectl run -n team-alpha -it --rm --restart=Never busybox --image=busybox -- sh
Inside the busybox Pod, use wget to access the debugging tool through the Service:
wget -qO- http://request-debug-svc
The response should be a plain-text summary showing request and server details, with the Name field set to the namespace the Pod is running in:
Name: team-alpha
Hostname: request-debug-5c8f9a7b64-k2v4p
IP: 127.0.0.1
IP: 10.244.0.12
RemoteAddr: 10.244.0.15:48762
GET / HTTP/1.1
Host: request-debug-svc
User-Agent: Wget
To confirm that the response contains the correct namespace, run:
wget -qO- http://request-debug-svc | grep 'Name:'
The output should show the team-alpha namespace:
Name: team-alpha
Repeat the same test for the team-beta namespace by running the busybox Pod with -n team-beta. The Name field should show team-beta instead of team-alpha, confirming that each Deployment is running in its own isolated namespace.
5.3.2.3 Verify namespace isolation
To confirm that the short Service name does not resolve across namespaces, create a temporary Pod in the default namespace:
kubectl run -it --rm --restart=Never busybox --image=busybox -- sh
Inside this Pod, attempt to reach the team-alpha debugging tool using its short service name:
wget -qO- --timeout=5 http://request-debug-svc
This fails because short Service names only resolve within the same namespace. Services in other namespaces are reachable using their fully qualified DNS name (<service>.<namespace>.svc.cluster.local):
wget -qO- http://request-debug-svc.team-alpha.svc.cluster.local
This request succeeds, demonstrating that Kubernetes namespaces scope resource visibility and RBAC, but do not enforce network-level isolation on their own. To restrict cross-namespace traffic, NetworkPolicies must be used in addition to namespaces.
The same can be done to access the team-beta debugging tool:
wget -qO- http://request-debug-svc.team-beta.svc.cluster.local
5.4 Task 4: Design and deploy a namespace verification endpoint in canary and stable namespaces
Your team uses a canary release strategy and needs a simple endpoint in each environment that confirms which namespace a request is being served from. This allows developers to verify that traffic is reaching the correct environment before promoting a canary release.
The endpoint must run as a hashicorp/http-echo container, which returns a configurable plain-text response. The response text will include the namespace name, injected at runtime through the downward API and Kubernetes variable substitution in the container arguments, making it easy to confirm namespace isolation from the response. It does not need to be highly resilient, since brief periods of unavailability are acceptable.
Other services within each namespace need a stable address to reach the endpoint, but it must not be accessible from outside the cluster.
5.4.1 Architectural design
The task requires running the same application in two isolated environments, brief downtime is acceptable, and the application must be reachable only from inside each namespace. These constraints drive four design decisions:
-
Two separate Namespaces (
canaryandstable) provide the isolation boundary. Every Kubernetes resource is scoped to a Namespace, so Deployments, Pods, and Services created in one Namespace are invisible to the other. This lets both environments share the same resource names without conflict. -
Because the application is a single container and brief downtime is acceptable, a Deployment with one replica per Namespace is enough. Each Deployment creates its own ReplicaSet, which recreates the Pod automatically if it crashes, at the cost of a short period of unavailability that the task explicitly allows.
-
Other services within each Namespace need a stable address to reach the namespace verification endpoint. Pod IPs change every time a Pod is recreated, so we place a ClusterIP Service (
ns-echo-svc) in front of the Pod in each Namespace. The Service provides a fixed cluster-internal DNS name and forwards traffic to the Pod. It accepts requests on port80and forwards them to the container’s port5678. -
The application must not be accessible from outside the cluster. A ClusterIP Service has no external port and no route from outside the cluster network, so it satisfies this requirement by design. No Gateway, Ingress, or NodePort is needed.

The diagram shows the resulting architecture: the canary and stable Namespaces each contain an independent Deployment and ClusterIP Service with the same names. External clients have no path into either environment, while internal services reach the namespace verification endpoint through the ClusterIP Service in their own Namespace. Cross-namespace access is possible only via the fully qualified DNS name (ns-echo-svc.<namespace>.svc.cluster.local), since short Service names resolve only within the same Namespace.
5.4.2 Implementation
We start by creating the two namespaces:
kubectl create namespace canary
kubectl create namespace stable
Next, we create a file called ns-echo.yaml that will be reused for both environments:
cat <<'EOF' > ns-echo.yaml
With the following content:
apiVersion: apps/v1
kind: Deployment
metadata:
  name: ns-echo
  labels:
    app: ns-echo
spec:
  replicas: 1
  selector:
    matchLabels:
      app: ns-echo
  template:
    metadata:
      labels:
        app: ns-echo
    spec:
      containers:
        - name: http-echo
          image: hashicorp/http-echo:0.2.3
          args:
            - "-text=namespace: $(ECHO_NAMESPACE)"
            - "-listen=:5678"
          ports:
            - containerPort: 5678
          env:
            - name: ECHO_NAMESPACE
              valueFrom:
                fieldRef:
                  fieldPath: metadata.namespace
EOF
The ECHO_NAMESPACE environment variable is injected using the downward API, which allows a container to read its own Pod metadata at runtime. Unlike the previous tasks, this container does not read the environment variable directly. Instead, the value is substituted into the container arguments using the $(ECHO_NAMESPACE) syntax. Kubernetes resolves this reference at Pod creation time, so the http-echo process receives -text=namespace: canary or -text=namespace: stable depending on which Namespace the Pod is scheduled in. The container then returns this text as the body of every HTTP response.
Notice that the manifest does not include a namespace field in the metadata. We will supply the target namespace at apply time using the -n flag, which lets us reuse the same manifest for both environments.
To verify the file was created correctly, run:
cat ns-echo.yaml
Apply the manifest to both namespaces:
kubectl apply -f ns-echo.yaml -n canary
kubectl apply -f ns-echo.yaml -n stable
Next, we expose each Deployment as a ClusterIP Service inside its respective namespace:
kubectl expose deployment ns-echo \
    -n canary \
    --name=ns-echo-svc \
    --type=ClusterIP \
    --port=80 \
    --target-port=5678
kubectl expose deployment ns-echo \
    -n stable \
    --name=ns-echo-svc \
    --type=ClusterIP \
    --port=80 \
    --target-port=5678
5.4.2.1 Verify resource creation
To verify that the Pods are running in each namespace, execute the following commands:
kubectl get pods -n canary -l app=ns-echo
kubectl get pods -n stable -l app=ns-echo
The output for each should look similar to this:
NAME                       READY   STATUS    RESTARTS   AGE
ns-echo-6b8d4f7c59-w3k9m   1/1     Running   0          1m
To verify that the Services are configured correctly in each namespace, run:
kubectl get svc -n canary ns-echo-svc
kubectl get svc -n stable ns-echo-svc
The output for each should look similar to this:
NAME           TYPE        CLUSTER-IP      EXTERNAL-IP   PORT(S)   AGE
ns-echo-svc    ClusterIP   10.96.147.93    <none>        80/TCP    1m
Note that the two Services share the same name (ns-echo-svc) but have different Cluster IPs, because they are independent resources in separate namespaces.
5.4.2.2 Test the namespace verification endpoint
To test the canary endpoint, create a temporary Pod inside the canary namespace and send a request through the Service:
kubectl run -n canary -it --rm --restart=Never busybox --image=busybox -- sh
Inside the busybox Pod, use wget to access the endpoint through the Service:
wget -qO- http://ns-echo-svc
The response should be plain text showing the namespace the Pod is running in:
namespace: canary
Repeat the same test for the stable namespace by running the busybox Pod with -n stable. The response should show namespace: stable instead of namespace: canary, confirming that each Deployment is running in its own isolated namespace.
5.4.2.3 Verify namespace isolation
To confirm that the short Service name does not resolve across namespaces, create a temporary Pod in the default namespace:
kubectl run -it --rm --restart=Never busybox --image=busybox -- sh
Inside this Pod, attempt to reach the canary endpoint using its short service name:
wget -qO- --timeout=5 http://ns-echo-svc
This fails because short Service names only resolve within the same namespace. Services in other namespaces are reachable using their fully qualified DNS name (<service>.<namespace>.svc.cluster.local):
wget -qO- http://ns-echo-svc.canary.svc.cluster.local
This request succeeds, demonstrating that Kubernetes namespaces scope resource visibility and RBAC, but do not enforce network-level isolation on their own. To restrict cross-namespace traffic, NetworkPolicies must be used in addition to namespaces.
The same can be done to access the stable endpoint:
wget -qO- http://ns-echo-svc.stable.svc.cluster.local
5.5 Task 5: Design and deploy an internal welcome page in blue-green namespaces
Your team uses a blue-green deployment strategy and needs an internal welcome page in each environment so that operators can verify which environment is currently active. Each environment must be fully self-contained, with its own Deployment and Service, so that one can be updated while the other continues to serve traffic undisturbed.
The welcome page must run as a nginxdemos/hello container using the plain-text tag, which returns a plain-text response showing server information such as the server address, server name, date, and request URI. Unlike the previous tasks, this container does not use the downward API to display the namespace, instead the server name corresponds to the Pod name, which is unique per namespace since each has its own independent Deployment and ReplicaSet. It does not need to be highly resilient, since brief periods of unavailability are acceptable.
Other services within each namespace need a stable address to reach the welcome page, but it must not be accessible from outside the cluster.
5.5.1 Architectural design
The task requires running the same application in two isolated environments, brief downtime is acceptable, and the application must be reachable only from inside each namespace. These constraints drive four design decisions:
-
Two separate Namespaces (
blueandgreen) provide the isolation boundary. Every Kubernetes resource is scoped to a Namespace, so Deployments, Pods, and Services created in one Namespace are invisible to the other. This lets both environments share the same resource names without conflict. -
Because the application is a single container and brief downtime is acceptable, a Deployment with one replica per Namespace is enough. Each Deployment creates its own ReplicaSet, which recreates the Pod automatically if it crashes, at the cost of a short period of unavailability that the task explicitly allows.
-
Other services within each Namespace need a stable address to reach the welcome page. Pod IPs change every time a Pod is recreated, so we place a ClusterIP Service (
ns-welcome-svc) in front of the Pod in each Namespace. The Service provides a fixed cluster-internal DNS name and forwards traffic to the Pod. It accepts requests on port8080and forwards them to the container’s port80. -
The application must not be accessible from outside the cluster. A ClusterIP Service has no external port and no route from outside the cluster network, so it satisfies this requirement by design. No Gateway, Ingress, or NodePort is needed.
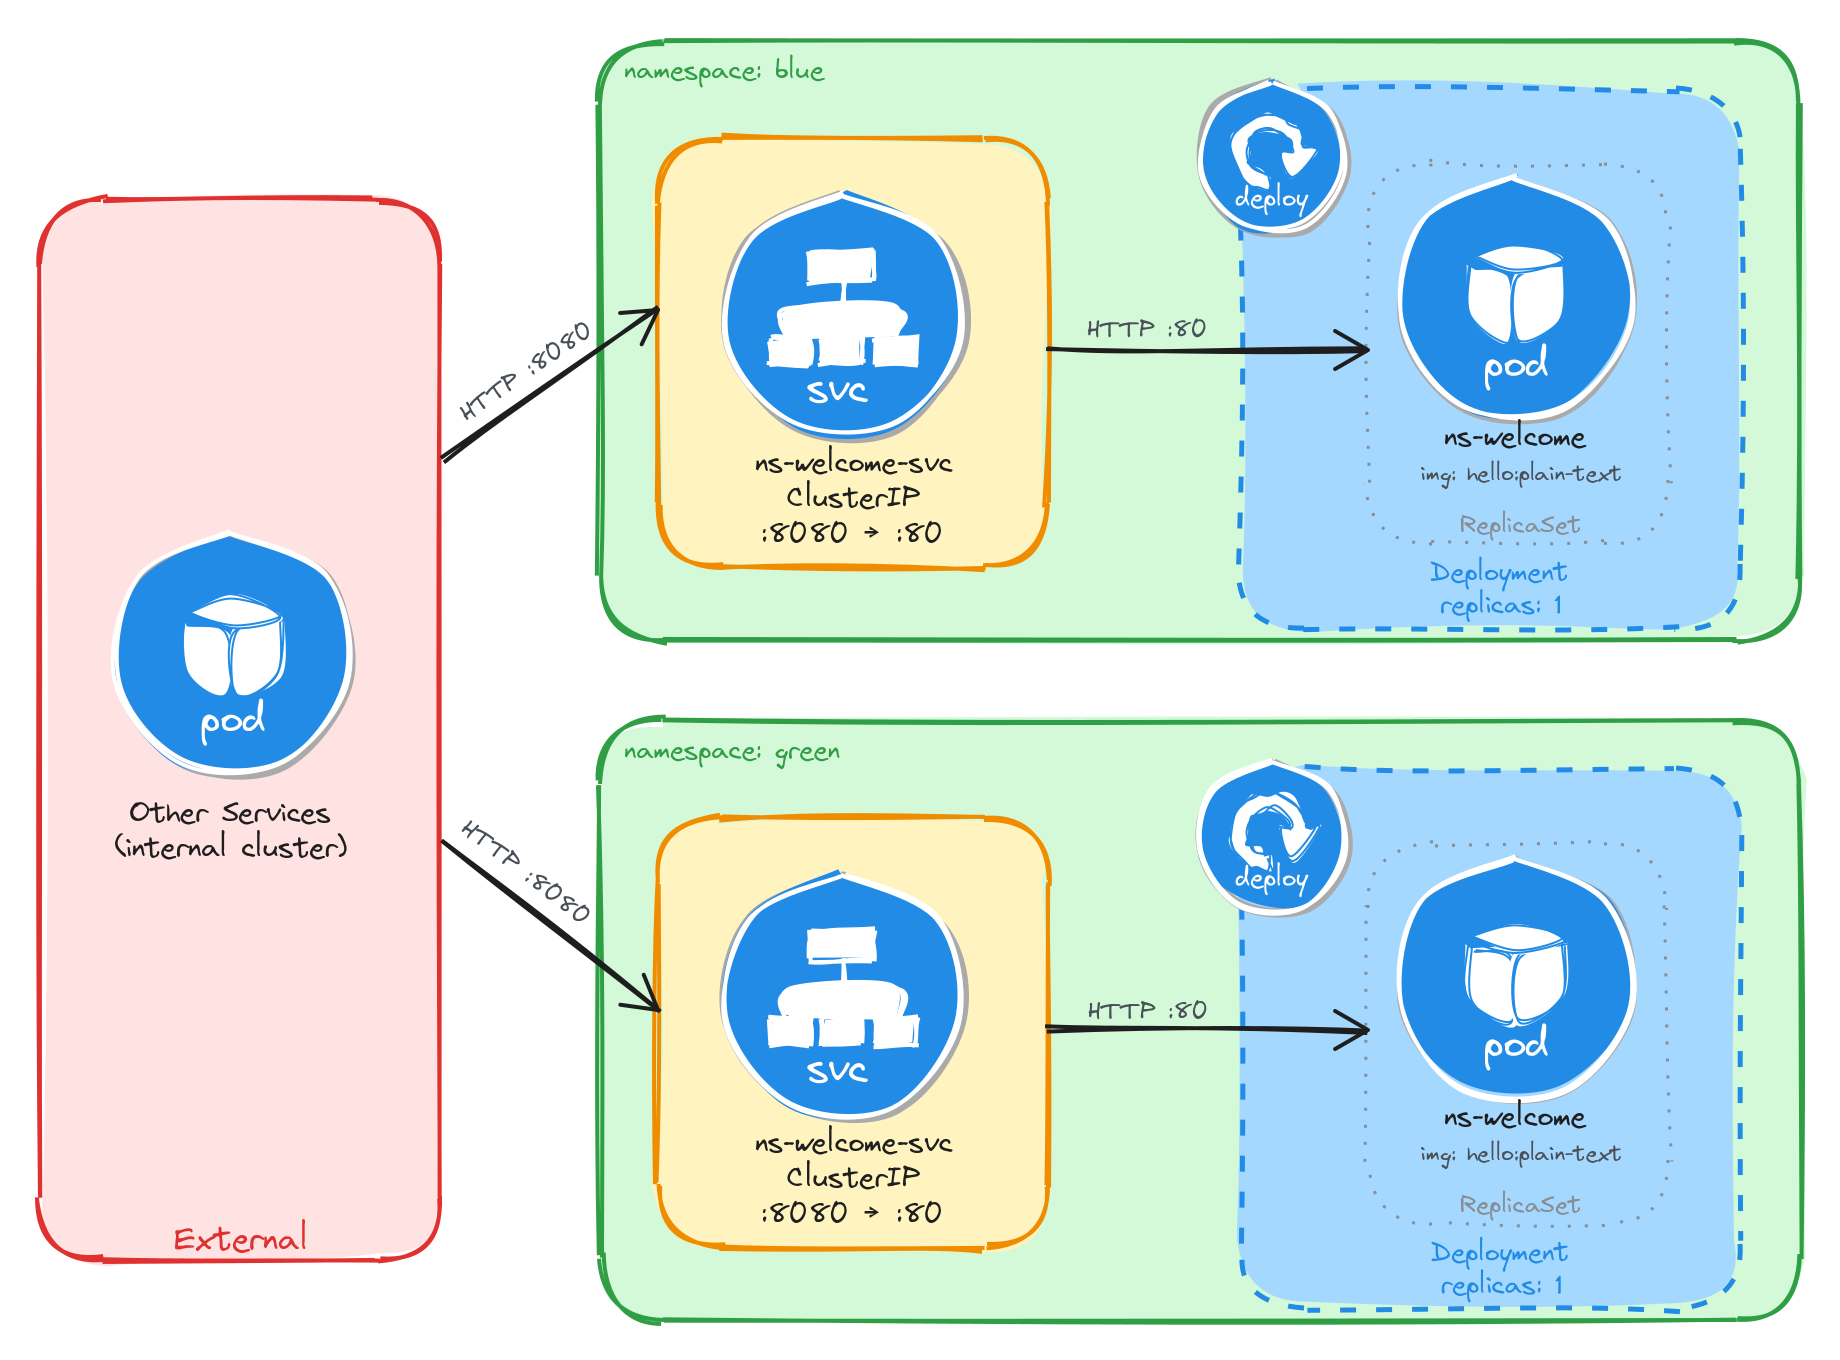
The diagram shows the resulting architecture: the blue and green Namespaces each contain an independent Deployment and ClusterIP Service with the same names. External clients have no path into either environment, while internal services reach the welcome page through the ClusterIP Service in their own Namespace. Cross-namespace access is possible only via the fully qualified DNS name (ns-welcome-svc.<namespace>.svc.cluster.local), since short Service names resolve only within the same Namespace.
5.5.2 Implementation
We start by creating the two namespaces:
kubectl create namespace blue
kubectl create namespace green
Next, we create a file called ns-welcome.yaml that will be reused for both environments:
cat <<EOF > ns-welcome.yaml
With the following content:
apiVersion: apps/v1
kind: Deployment
metadata:
  name: ns-welcome
  labels:
    app: ns-welcome
spec:
  replicas: 1
  selector:
    matchLabels:
      app: ns-welcome
  template:
    metadata:
      labels:
        app: ns-welcome
    spec:
      containers:
        - name: hello
          image: nginxdemos/hello:plain-text
          ports:
            - containerPort: 80
EOF
This manifest does not use the downward API because the nginxdemos/hello container does not support configuring its response through environment variables. The server name in the response is derived from the Pod name, which is generated by the ReplicaSet in each Namespace. Since each Namespace has its own Deployment and ReplicaSet, the Pod names will differ, making it possible to tell which environment served a request.
Notice that the manifest does not include a namespace field in the metadata. We will supply the target namespace at apply time using the -n flag, which lets us reuse the same manifest for both environments.
To verify the file was created correctly, run:
cat ns-welcome.yaml
Apply the manifest to both namespaces:
kubectl apply -f ns-welcome.yaml -n blue
kubectl apply -f ns-welcome.yaml -n green
Next, we expose each Deployment as a ClusterIP Service inside its respective namespace:
kubectl expose deployment ns-welcome \
    -n blue \
    --name=ns-welcome-svc \
    --type=ClusterIP \
    --port=8080 \
    --target-port=80
kubectl expose deployment ns-welcome \
    -n green \
    --name=ns-welcome-svc \
    --type=ClusterIP \
    --port=8080 \
    --target-port=80
5.5.2.1 Verify resource creation
To verify that the Pods are running in each namespace, execute the following commands:
kubectl get pods -n blue -l app=ns-welcome
kubectl get pods -n green -l app=ns-welcome
The output for each should look similar to this:
NAME                          READY   STATUS    RESTARTS   AGE
ns-welcome-6c9d4f8b5a-t4w2q   1/1     Running   0          1m
To verify that the Services are configured correctly in each namespace, run:
kubectl get svc -n blue ns-welcome-svc
kubectl get svc -n green ns-welcome-svc
The output for each should look similar to this:
NAME              TYPE        CLUSTER-IP      EXTERNAL-IP   PORT(S)    AGE
ns-welcome-svc    ClusterIP   10.96.118.56    <none>        8080/TCP   1m
Note that the two Services share the same name (ns-welcome-svc) but have different Cluster IPs, because they are independent resources in separate namespaces.
5.5.2.2 Test the welcome page
To test the blue welcome page, create a temporary Pod inside the blue namespace and send a request through the Service:
kubectl run -n blue -it --rm --restart=Never busybox --image=busybox -- sh
Inside the busybox Pod, use wget to access the welcome page through the Service:
wget -qO- http://ns-welcome-svc:8080
The response should be plain text showing server information:
Server address: 10.244.0.18:80
Server name: ns-welcome-6c9d4f8b5a-t4w2q
Date: 31/Mar/2026:14:22:05 +0000
URI: /
Request ID: e7a3b1c9d4f2e8a6b0c5d7f1a9e3b2c4
To identify which Pod served the request, run:
wget -qO- http://ns-welcome-svc:8080 | grep 'Server name:'
The output should show the Pod name from the blue namespace:
Server name: ns-welcome-6c9d4f8b5a-t4w2q
Repeat the same test for the green namespace by running the busybox Pod with -n green. The server name should show a different Pod name, confirming that each Namespace has its own independent Deployment with separately managed Pods.
5.5.2.3 Verify namespace isolation
To confirm that the short Service name does not resolve across namespaces, create a temporary Pod in the default namespace:
kubectl run -it --rm --restart=Never busybox --image=busybox -- sh
Inside this Pod, attempt to reach the blue welcome page using its short service name:
wget -qO- --timeout=5 http://ns-welcome-svc:8080
This fails because short Service names only resolve within the same namespace. Services in other namespaces are reachable using their fully qualified DNS name (<service>.<namespace>.svc.cluster.local):
wget -qO- http://ns-welcome-svc.blue.svc.cluster.local:8080
This request succeeds, demonstrating that Kubernetes namespaces scope resource visibility and RBAC, but do not enforce network-level isolation on their own. To restrict cross-namespace traffic, NetworkPolicies must be used in addition to namespaces.
The same can be done to access the green welcome page:
wget -qO- http://ns-welcome-svc.green.svc.cluster.local:8080